Starter Python Application
This document describes how to start a Passenger application in Python language.
Basic application
passenger_wsgi.py is the entrypoint for any python application.
cd ~/ondemand/dev
mkdir python-hello-world
cd python-hello-world
touch passenger_wsgi.py
Now with the passenger_wsgi.py file created, we can add this content to
serve a response to a request.
# passenger_wsgi.py
import sys

def application(environ, start_response):
    start_response('200 OK', [('Content-type', 'text/plain')])
    return ["Hello World from Open OnDemand (Python WSGI)!\n\n" + sys.version]
Boot the application
Now that the app's all setup and implemented, you should be able to
boot it up. To do so, simply navigate to My Sandbox Apps (Development)
in the Develop menu of your OnDemand installation.
There you should see this application at the top of the list. Clicking
Launch Python Hello World will launch this application in a new tab.
When the new tab opens you should see a mostly blank page with the something like the following:
Hello World from Open OnDemand (Python WSGI)!
3.9.21 (main, Dec  5 2024, 00:00:00)
[GCC 11.5.0 20240719 (Red Hat 11.5.0-2)]
This is your new Python application!
Application using Flask and a virtual environment
The basic application above is fine, but you'll likely need to add more dependencies and load those dependencies at runtime.
So this section goes over adding the Flask web framework and having the application load the virtual environment that has your dependencies in it.
Create the virtual environment
First, we need to create the virtual environment. Issue this command below
to create one. This will create a subdirectory python-hello-world with a
bin/activate file you can use to activate the environment.
python3 -m venv python-hello-world
You can also use other Python virtual environment managers such as uv. If you
have uv installed, the following command will create a virtual environment
subdirectory .venv.
uv venv
Install required packages
Now, let's create the requirements.txt file where we'll add the application's
required libraries. Here, we're only adding flask of any version.
# requirements.txt
flask
Activate environment and install requirements.txt.
source python-hello-world/bin/activate
python3 -m pip install -r requirements.txt
Create application files
In the basic example above, the entire implementation is held within a passenger_wsgi.py.
This project is more advanced, so it will include two files. passenger_wsgi.py and
app.py. app.py will hold the logic for the application.
passenger_wsgi.py simply imports the app from the app.py file. This is all that's required
for this file.
# passenger_wsgi.py
from app import MyApp as application
app.py on the other hand, has logic associated with the web application in it.
It imports the Flask libraries, configures the routes and starts the flask server.
# app.py
from flask import Flask
import sys

MyApp = Flask('python_hello_world')

@MyApp.route("/")
def index():
  return 'Hello World!<br>' + sys.version

if __name__ == "__main__":
  MyApp.run()
Using the virtual environment
At this point, the app is basically done, but won't boot up because it can't find Flask libraries. We created a virtual environment in a previous step, now we have to get OnDemand to recognize this environment.
To do this, we need to create a bin/python wrapper file to load the appropriate virtual environment.
#!/usr/bin/env bash

SCRIPT_DIR=$( cd -- "$( dirname -- "${BASH_SOURCE[0]}" )" &> /dev/null && pwd )
source $SCRIPT_DIR/../python-hello-world/bin/activate

exec /bin/env python3 "$@"
Warning
Ensure that this bin/python file has executable permissions on it.
Issue the command chmod +x bin.python to give it executable permissions.
Now, with the python wrapper script to load the environment for your application, it should boot up correctly.
Publish App
Publishing an app requires two steps:
Updating the
manifest.ymlto specify the category and optionally subcategory, which indicates where in the dashboard menu the app appears.Having an administrator checkout a copy of the production version to a directory under
/var/www/ood/apps/sys.
Steps:
Add category to manifest so the app appears in the Files menu:
name: Quota
description: Display quotas
icon: fa://hdd-o
+category: Files
+subcategory: Utilities
Version these changes. Click Shell button on app details view, and then
committhe changes:git add . git commit -m "update manifest for production" # if there is an external remote associated with this, push to that git push origin master
As the admin,
sudo copyorgit clonethis repository to production.# as sudo on OnDemand host: cd /var/www/ood/apps/sys git clone /users/PZS0562/efranz/ondemand/dev/quota
Reload the dashboard.
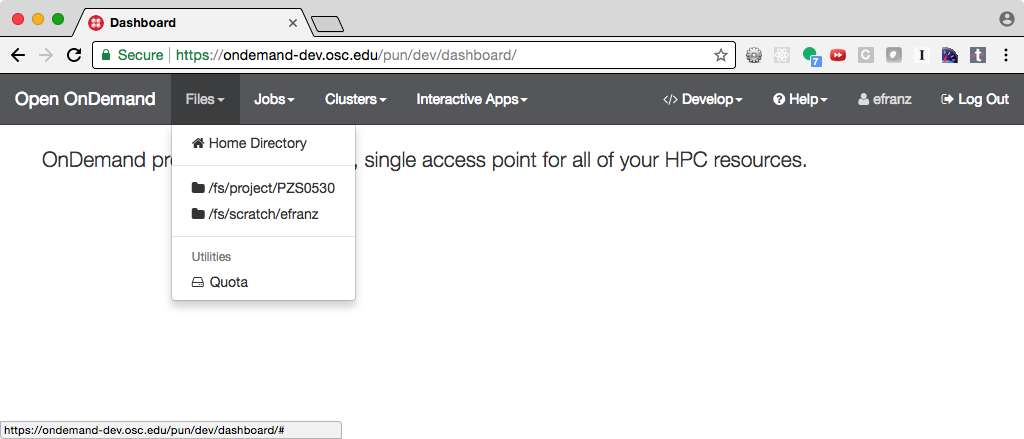
Fig. 9 Every user can now launch the Quota from the Files menu.
Warning
Accessing this new app for the first time will cause your NGINX server to restart, killing all websocket connections, which means resetting your active web-based OnDemand Shell sessions.