Customizations
Tip
Check out the PUN environment for an overview of how environment variables can be added.
Enabling and Disabling Applications
OnDemand is comprised of a few components. Each one you can disable or limit access by simply changing the file permissions of the application. The application will only be available if regular users can read the files. When they cannot read the files, the application is disabled. When they can, it is enabled.
All the applications OnDemand installs are located in /var/www/ood/apps/sys.
Disabling Applications
So, for example, if you wished to disable the file browser for all users you would simply change its directory to 700 so it's unreadable by regular users.
When this directory is unreadable by regular users, the functionality it provides will be disabled.
sudo chmod 700 /var/www/ood/apps/sys/files
Enabling Applications for a limited number of users
Alternatively, if you wished to limit access you can do so through group
permissions. For example, if you wanted to limit access to the file browser
to only members in the Unix group staff, you would simply apply the
applicable file permission such that anonymous users cannot access the
directory while members of the staff Unix group can.
sudo chmod 750 /var/www/ood/apps/sys/files
sudo chown root:staff /var/www/ood/apps/sys/files
This ensures:
The application is readable and executable by the staff group.
All other users not in staff group will not see or access it.
Enabling Applications
Conversely, if the directory is already 700 just reverse the process to
enable the application. Set the directory to 755 to enable it for all users.
sudo chmod 755 /var/www/ood/apps/sys/projects
Announcements
To add an announcement message that appears at the top of the dashboard you can create a file at /etc/ood/config/announcement.(md|yml) or /etc/ood/config/announcements.d/any_file_name.(md|yml).
On each request the dashboard will check for the existence of this file. If it exists, the contents will be converted using markdown converter to HTML and displayed inside a bootstrap alert.
For example, if I create an announcement.md file with the contents:
**NOTICE:** There will be a two day downtime on February 21-22, 2017. OSC
OnDemand will be unavailable during this period. For details, please visit
[http://bit.ly/2jhfyh7](http://bit.ly/2jhfyh7).
the user would see this message at the top of the dashboard:
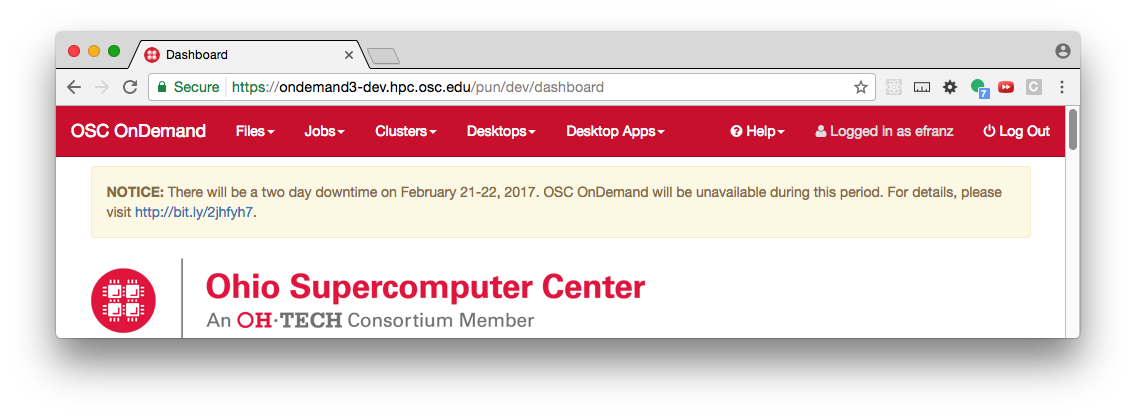
Fig. 1 Example of the Dashboard announcement.
If the announcement file has the extension yml and is a YAML file it is first rendered using ERB and then the resulting file is parsed as YAML. The valid keys are:
Key |
Description |
|---|---|
|
The type of announcement. Values can be |
|
The announcement's message. |
|
Optional unique identifier for the announcement. This is useful for managing changes to announcements that are used as ToS or EULA that users need to agree to.
When provided, it will be used to validate if the announcement has been dismissed regardless of the content. Changing the |
|
Specify if the announcement is dismissible or not with |
|
Specify if the announcement is required or not with |
|
Optional parameter to customize the text content for the button to dismiss the announcement.
Defaults to |
Tip
You can use required announcements to present users with a ToS (terms of service),
EULA (end user license agreement) or similar.
Because the announcement is rendered via ERB you can do some interesting things, like stop showing the announcement past a specified date:
type: warning
msg: |
  <% if Time.now < Time.new(2018, 9, 24, 12, 0, 0) %>
  A **Ruby Partial Downtime** for 4 hours on Monday, September 24 from 8:00am to 12:00pm
  will prevent SSH login to Ruby nodes and Ruby VDI sessions.
  <% end %>
Note
Warnings about the announcement file being missing may be present in users' Nginx logs. Despite the warning the Dashboard will still function normally without those files being present.
The file path for the announcement message can be customize using configuration properties, see OnDemand configuration documentation.
Message of the Day (MOTD)
You can configure the Dashboard to display the /etc/motd file on the front page - the same file that is displayed when logging into to a login node.
To display a MOTD file on the Dashboard ensure that the environment variables $MOTD_PATH and $MOTD_FORMAT are set, where
MOTD_PATH="/etc/motd" # this supports both file and RSS feed URIs
MOTD_FORMAT="txt" # markdown, txt, rss, markdown_erb, txt_erb
Tip
The _erb formats support ERB rendering to generate more dynamic messages.
Warning
Some MOTD formats like rss, markdown and markdown_erb can contain malicious
HTML content. For your safety, by default, the Open OnDemand system will not render
HTML. We provide a configuration to enable HTML rendering in MOTD
should you need to render HTML.

Fig. 2 Message of the Day appears in the body of the index page.
We recommend setting this in /etc/ood/config/apps/dashboard/env.
Branding
You can customize the logo, favicon, title, and navbar colors of OnDemand.
We recommend setting these values using the OnDemand configuration properties. Currently only the dashboard uses the colors in the navbar.
Feature |
Property |
Details |
|---|---|---|
Title |
|
The title appears in the navbar and is controlled by the property |
Logo |
|
The default value for |
Logo height |
|
The CSS height of the dashboard logo. |
Favicon |
|
The favicon is expected to exist at the path |
Brand background color |
|
Controls the background color of the navbar in the dashboard |
Brand foreground color |
|
Controls the background color the active link in the navbar in the dashboard |
Replace header title with logo |
|
Value should be URL to logo i.e. |
Navigation bar theme |
|
By default we use |
Note
It is possible to configure these settings using environment variables, although this is deprecated. For information about the properties and environment variables, see the OnDemand configuration documentation.
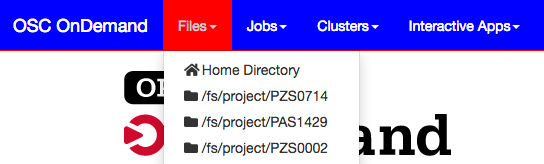
Fig. 3 Navigation bar when brand_bg_color is #0000ff and brand_link_active_bg_color is #ff0000 and dashboard_title is OSC OnDemand.
Custom CSS files
For more control on the look and feel of the dashboard pages, use custom CSS files. These CSS files will be added to all dashboard pages and loaded last to have precedence over default styles.
Add your CSS file references to the custom_css_files array property.
Drop the files into the Apache public assets folder, the default location is: /var/www/ood/public.
The system will prepend the /public URL path, based on the public_url property, to load the files correctly.
Example: to load the following CSS file: /var/www/ood/public/myfolder/custom-branding.css, add the configuration below.
This will result in a CSS tag added to all dashboard pages with the path: /public/myfolder/custom-branding.css.
custom_css_files: ["/myfolder/custom-branding.css"]
Overriding Pages
Open OnDemand is built with Ruby on Rails which uses partials
to build the web pages that are ultimately served to the clients.
All partials are held within dashboard's views folder. These
are the default partials that get distributed when you install
the package.
Open OnDemand provides a facility to override any of these partial
pages by supplying new files in /etc/ood/config/apps/dashboard/views.
Let's look at an example where a center can provide a different,
specialized, footer for the bottom of the page. Overriding the
partial that has been distributed.
First, you would need to find the original partial that is being
distributed.
We can find this file's location at layouts/_footer.html.erb
(relative to the dashboard's views folder).
To override it, we simply provide a new file of the same name
and path in the /etc/ood/config/apps/dashboard/views folder.
So, the full file path would be /etc/ood/config/apps/dashboard/views/layouts/_footer.html.erb.
By providing a simple html file like the one below, placed in the location in the
previous sentence, your center has now provided a different footer than the one
distributed by the Open OnDemand package.
<div class="text-center p-4 my-3 fs-5" >
  My center's custom footer.
<div>
The [utility classes](https://getbootstrap.com/docs/5.0/utilities/spacing/) for text alignment, padding, margin, and font size in the sample are from Bootstrap, the front-end framework used in Open OnDemand. Using Bootstrap classes in custom overrides, widgets, and pages streamlines development and maintains a consistent user experience. The current installed version is Bootstrap 5.3.
Add URLs to Help Menu
These URLs can be specified, which will appear in the Help menu and on other locations of the Dashboard. We recommend setting this in /etc/ood/config/apps/dashboard/env.
Name |
Environment variable |
Example value |
|---|---|---|
Support URL |
OOD_DASHBOARD_SUPPORT_URL |
|
User Documentation |
OOD_DASHBOARD_DOCS_URL |
|
Developer Documentation |
OOD_DASHBOARD_DEV_DOCS_URL |
https://osc.github.io/ood-documentation/master/app-development.html (link appears in Develop drop-down if developer mode enabled for user) |
Change Password URL |
OOD_DASHBOARD_PASSWD_URL |
|
Custom Help URL (Also requires locale |
OOD_DASHBOARD_HELP_CUSTOM_URL |
Since OnDemand 2.1, custom links can be added to the Help menu using the configuration property help_menu.
Links will be inserted at the end of the core links already included in the menu by the OnDemand code-base.
help_menu supports all the link definitions developed for the custom navigation configuration.
For more information on how to create custom links, see for example adding urls to menus.
For information about how to configure properties, see the OnDemand configuration documentation.
help_menu:
  - group: "Documentation"
  - title: "Jupyter Docs"
    icon: "fas://book"
    url: "https://mydomain.com/path/jupyter"
  - title: "Support Docs"
    icon: "fas://book"
    url: "https://mydomain.com/path/support/docs"
  - group: "Custom Pages"
  - page: "rstudio_guide"
    title: "RStudio Guide"
    icon: "fas://window-restore"
  - group: "Profiles"
  - profile: "team1"
    title: "Team 1"
    icon: "fas://user"

Add Shortcuts to Files Menu
The Files menu by default has a single link to open the Files app in the user's Home Directory. More links can be added to this menu, for Scratch space and Project space directories.
Adding more links currently requires adding a custom initializer to the
Dashboard app. Ruby code is placed in the initializer to add one or more Ruby
FavoritePath (or Pathname for backwards compatibility) objects to the OodFilesApp.candidate_favorite_paths array, a
global attribute that is used in the Dashboard app.
FavoritePath is instantiated with a single String or Pathname argument, the
directory path, and with an optional keyword argument title specifying a
human readable title for that path.
Start by creating the file
/etc/ood/config/apps/dashboard/initializers/ood.rb as such:
# /etc/ood/config/apps/dashboard/initializers/ood.rb

Rails.application.config.after_initialize do
  OodFilesApp.candidate_favorite_paths.tap do |paths|
    # add project space directories
    projects = User.new.groups.map(&:name).grep(/^P./)
    paths.concat projects.map { |p| FavoritePath.new("/fs/project/#{p}")  }

    # add User scratch space directory
    paths << FavoritePath.new("/fs/scratch/#{User.new.name}")

    # Project scratch is given an optional title field
    paths.concat projects.map { |p| FavoritePath.new("/fs/scratch/#{p}", title: "Scratch")  }
  end
end
The variable
pathsis an array ofFavoritePathobjects that define a list of what will appear in the Dashboard menu for FilesAt OSC, the pattern for project paths follows
/fs/project/project_name. So above we:get an array of all user's groups by name
filter that array for groups that start with
P(i.e.,PZS0002,PAW0003, ...)using
mapwe turn this array into an array ofFavoritePathobjects to all the possible project directories the user could have.extend the paths array with this list of paths
For possible scratch space directories, we look for either
/fs/scratch/project_nameor/fs/scratch/user_nameAdditionally project scratch directories have a 'title' attribute and will with in the drop-down with both the title and the path.
The following example adds all directories within the specified base directories to the favorite paths. This approach is ideal when there is no specific directory naming logic to follow. It also appropriately handles Access Control Lists (ACLs). If a directory does not exist, no error is raised, making this configuration easily exportable to different clusters.
# /etc/ood/config/apps/dashboard/initializers/ood.rb

Rails.application.config.after_initialize do
  OodFilesApp.candidate_favorite_paths.tap do |paths|

    # Hash of base paths to check for additional directories with titles
    # location => Title
    base_paths = {
      '/home/share/' => 'Shared home',
      '/srv/scratch/shares/' => 'Shared scratch',
      '/srv/scratch/groups/' => 'Group scratch',
      '/srv/fast/users/' => 'Fast user'
      # Add more paths and titles here if needed
    }

    base_paths.each do |base_path, title|
      # Check if the base path exists and is a directory, to avoid error
      next unless Dir.exist?(base_path)

      # Get all entries in the current base path
      Dir.entries(base_path).each do |entry|
        # Construct the full path for the current entry
        full_path = File.join(base_path, entry)

        # Skip if it's not a directory or if it's a special entry like '.' or '..'
        next unless File.directory?(full_path) && !['.', '..'].include?(entry)

        # Check if the directory is readable and executable
        if File.readable?(full_path) && File.executable?(full_path)
          # Access the value of the current base_path using the `title` variable
          paths << FavoritePath.new(full_path, title: "#{title}: #{File.basename(full_path)}")
        end
      end
    end
  end
end

# The variable ``base_paths`` is an hash (``dirname`` => ``Title``) of all directories you want to parse. For the directory ``OSC_test`` in ``/srv/scratch/groups/``; the favorite path will be displayed as following

| Group scratch: OSC_test | /srv/scratch/groups/OSC_test |

On each request, the Dashboard will check for the existence of the directories
in ``OodFilesApp.candidate_favorite_paths`` array and whichever directories
exist and the user has access to will appear as links in the Files menu under
the Home Directory link.
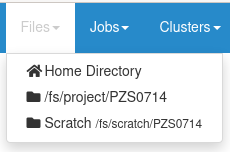
Fig. 4 Shortcuts to scratch and project space directories in Files menu in OSC OnDemand.
You must restart the Dashboard app to see a configuration change take effect. This can be forced from the Dashboard itself by selecting Help → Restart Web Server from the top right menu.
If you access the Dashboard, and it crashes, then you may have made a mistake
in ood.rb file, whose code is run during the initialization of the Rails
app.
Configuration Profiles
Note
The profile based configuration is an experimental feature. Not all properties have been migrated to be compatible. See the list of supported properties in the configuration documentation
Configuration properties can be organized in a hierarchy using profiles. With profiles, administrators can create different configuration settings within the same OnDemand installation. A profile can be pre-selected or dynamically changed while using the Dashboard application.
To define profile properties, we have to group them under a profile name within the profiles keyword.
Multiple profiles can be created using different files, the configuration
logic will aggregate all profiles into a single consolidated object.
profiles:
  profile_name:
    config_property: config_value
OnDemand uses an inheritance and override approach for profiles. The root profile is the default profile created by the system based on all the properties defined outside any profile definition. All other profiles will inherit these values.
Then, profile properties can override these values or define new ones as required.
The example below shows how the root profile defines a value for pinned_apps and pinned_apps_menu_length properties.
The rstudio_group profile inherits the property value for pinned_apps_menu_length,
and overrides the value for pinned_apps. As well, it defines a value for the property pinned_apps_group_by.
pinned_apps: [sys/*]
pinned_apps_menu_length: 10

profiles:
  rstudio_group:
    pinned_apps: [sys/rstudio]
    pinned_apps_group_by: "department"
Manual Profile Selection
The selection of a profile can be done manually by updating the user settings profile. By default the root profile is selected. Profile selection can be done using configurable navigation links. These links will update the profile, save the newly selected profile in the user settings file and reload the Dashboard.
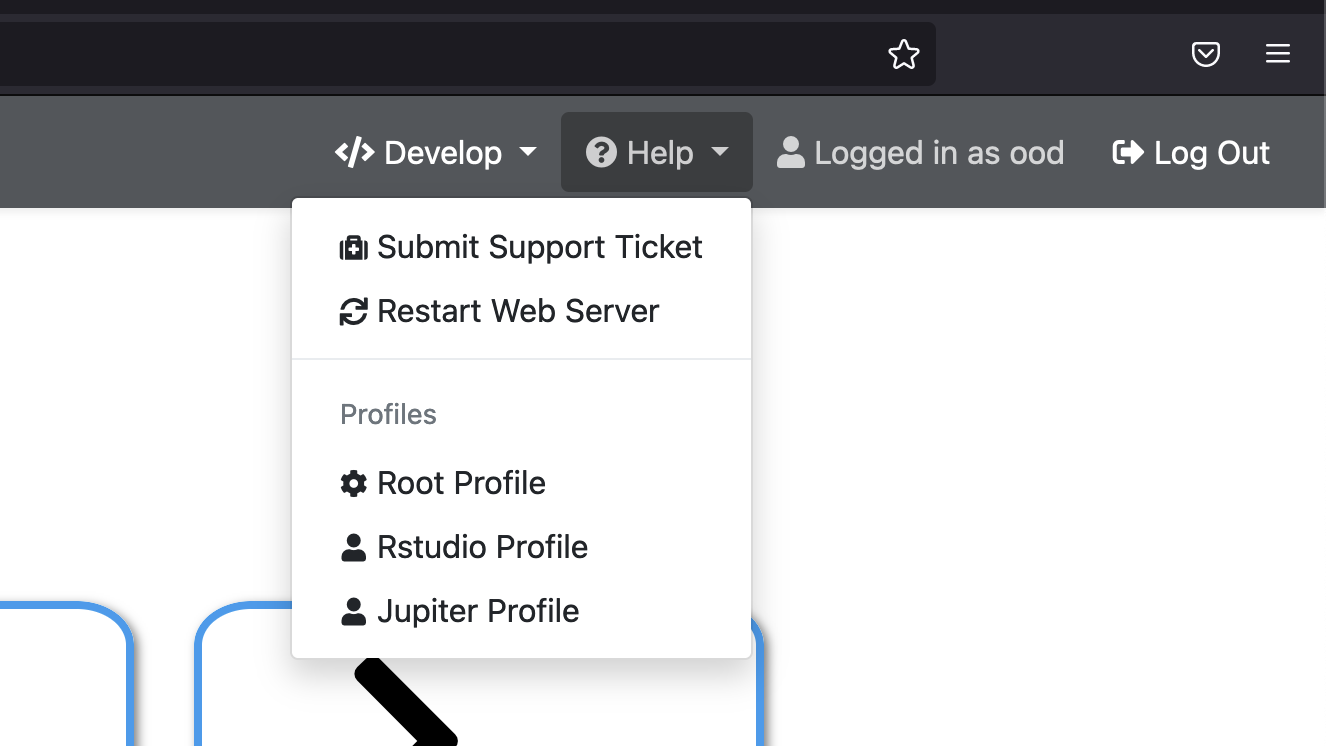
To add profile links to the Help navigation drop-down menu use the configuration property profile_links.
For more information on how to add profile links to the navigation bar in various places, see
menus for profile links.
profile_links:
  - group: "Profiles"
  - profile: ""
    title: "Root Profile"
    icon: "fas://cog"
  - profile: rstudio_group
    title: "Rstudio Profile"
    icon: "fas://user"
  - profile: jupyter_group
    title: "Jupiter Profile"
    icon: "fas://user"
Tip
Use the group property to add a section header or to organize your profiles as shown above.
Profile links can be configured as well using the Help menu customizations.
Note
Your profile selection is stored in your OnDemand user settings file.
The profile key in this YAML file provides the value used to select your current profile.
The user settings file is stored in your OnDemand data folder, this is usually ~/ondemand/data/sys/dashboard/.ood.
Manual updates to this file will require an application restart to load the new values.
Automatic Profile Selection
Request Hostname profile selection: use the current request hostname as the selected profile. To enable this feature, set the configuration property
host_based_profilestotrue. A request tohttps://www.ondemand.com/pun/sys/dashboardwill usewww.ondemand.comas the selected profile name.Configure the profiles using the hostname and the system will use the profile properties automatically.
profiles:
  www.ondemand.com:
    config_property: config_value
Tip
If you have a need to create multiple profile definitions that have the same configuration, you could use aliases.
This is a feature of YAML files. You can use YAML anchors and aliases to set the same profile configuration
to more than one definition without duplication. This YAML feature only works when defined and used within the same file.
The example below creates 4 profiles all with the same configuration:
profiles:
  www.production.com: &production_profile # Anchor definition
    config_property: config_value
    config_property: config_value
    config_property: config_value

  www.local.com: *production_profile # Defining an alias to the previously set anchor.
  www.test.com: *production_profile
  www.staging.com: *production_profile
Changing the Navigation bar
There are a couple ways to change the navigation bar in Open OnDemand, some are simpler than others.
This section provides the outline of how the navigation bar is generated to begin with, then details the various ways to modify it.
Once you understand how the navigation bar is generated automatically, you can take steps to customize it as you see fit.
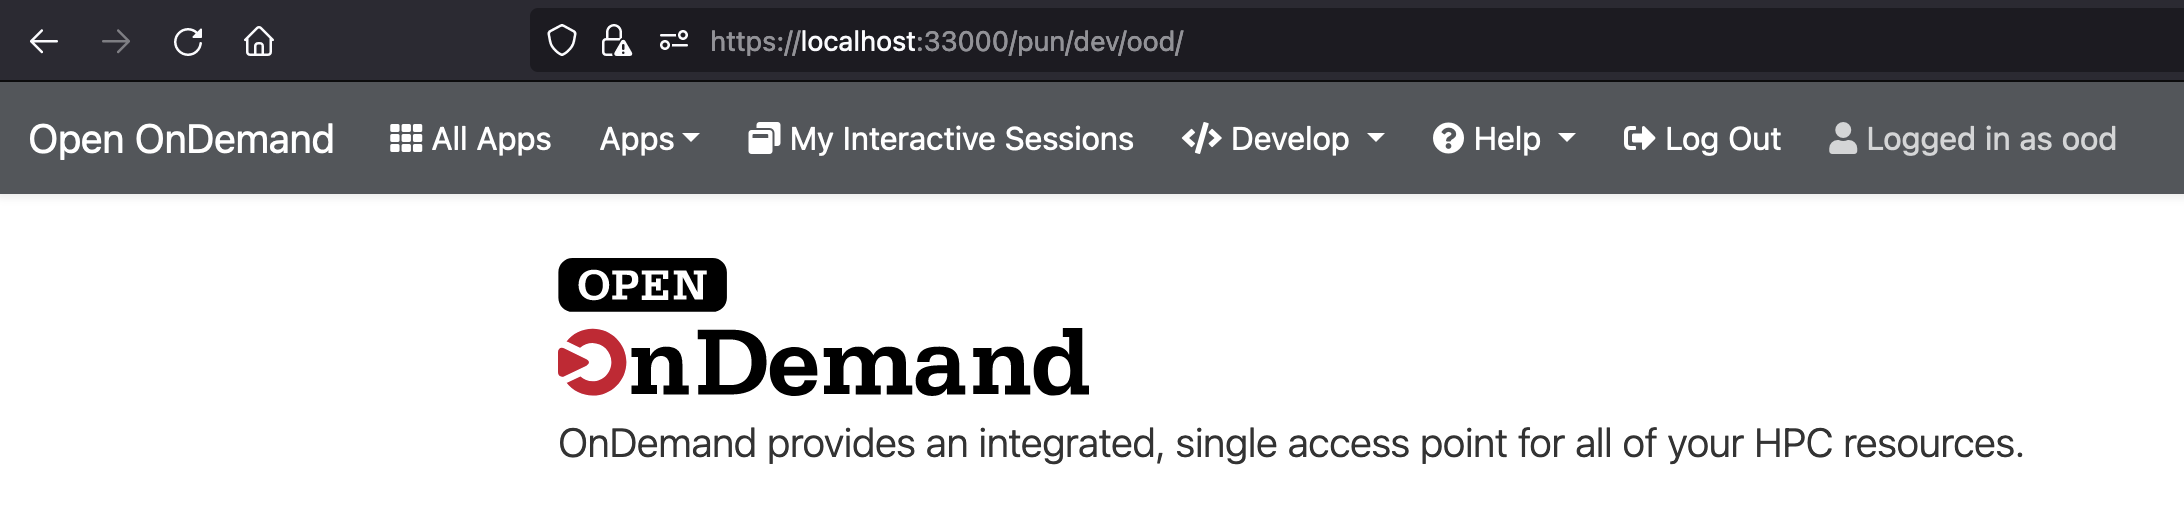
Understanding the default navigation bar
Some navigation menus and links are built-in to the system. The system
will generate drop-down menus for Files, Jobs, Clusters and
Interactive Apps automatically. It will also generate the link for
My Interactive Sessions by default.
Here's an image of you'd expect to see by default.

Open OnDemand is a platform for other applications, like Jupyter & RStudio.
As such, the default navigation bar builds itself based on what applications
it has discovered. The system will search /var/www/ood/apps/sys/ for these
applications.
Every application should have Manifest YAML files. The system reads
these manifests files and builds additional drop-down menus (or adds to existing menus)
based on the category field.
By default, the system will generate a new drop-down menu for every category
it encounters. Within each drop-down menu it will add separators for each
subcategory it encounters.
Fully customizing the navigation bar
Since 3.0, Open OnDemand provides a way to completely control the navigation bar
through the nav_bar and help_bar ondemand.d/*.yml files configuration properties.
Warning
As described in Understanding the default navigation bar, the system auto-generates
drop-down menus based on the applications it discovers. If the nav_bar or
help_bar configurations are set, the system will only show what you've defined.
Before we look at how to modify it in detail, let's look at what the default configuration would be (without showing any discovered apps).
# 'nav_bar' is the left side of the navigation bar.
nav_bar:
  # 'apps' drop-down menu is shown if you've set 'pinned_apps'.
  - apps
  - files
  - jobs
  - clusters
  - interactive apps
  - my interactive sessions

  # 'all apps' is disabled by default, but would be next if you set 'show_all_apps_link'.
  # - all apps

# 'help_bar' is the right side of the navigation bar.
help_bar:
  - develop
  - help
  - user
  - logout
The configuration above would be equivalent to the default navigation bar as described in Understanding the default navigation bar.
As menus are dynamically discovered from your system, this documentation can only cover how a fresh install - with no other applications - would behave.
A custom navigation definition is a list of navigation items. A navigation item could be a navigation menu or a navigation link. A navigation menu contains a list of navigation links with optional link groups.
There are several ways of creating a navigation menu.
Menus by Application category
One of the easiest ways to create menus is to create them based off of the applications categories.
The title of the drop-down menu will be the category itself, and menu items
(applications) will be grouped by their subcategory. It is not possible to
set an icon. The category matching is case insensitive.
Here's an example using the interactive apps category. Just like the default
navigation bar, this will generate a drop-down menu of all the applications the system
has discovered in that category.
As you can see from the image, the system has discovered eight applications in two subcategories.
nav_bar:
  - "interactive apps"
Predefined templates
As you can see from the example default configuration in fully-customizing-the-navbar, there are several pre-defined navigation menus that you can use.
A complete list of predefined templates is:
all_apps- The link to the all applications page.apps- A drop down menu ofpinned_apps. Note that you need to setpinned_appsfor this to show up.sessions- The link to "My Interactive Sessions" page.develop- The drop-down menu for developers, titled "Develop".help- The "Help" drop-down menu.log_out- The link to logout, titled "Logout".user- The "Logged in as <user>" text.
Here's an example of defining all of them and what that would look like.
nav_bar:
  - "all_apps"
  - "apps"
  - "sessions"
  - "develop"
  - "help"
  - "log_out"
  - "user"
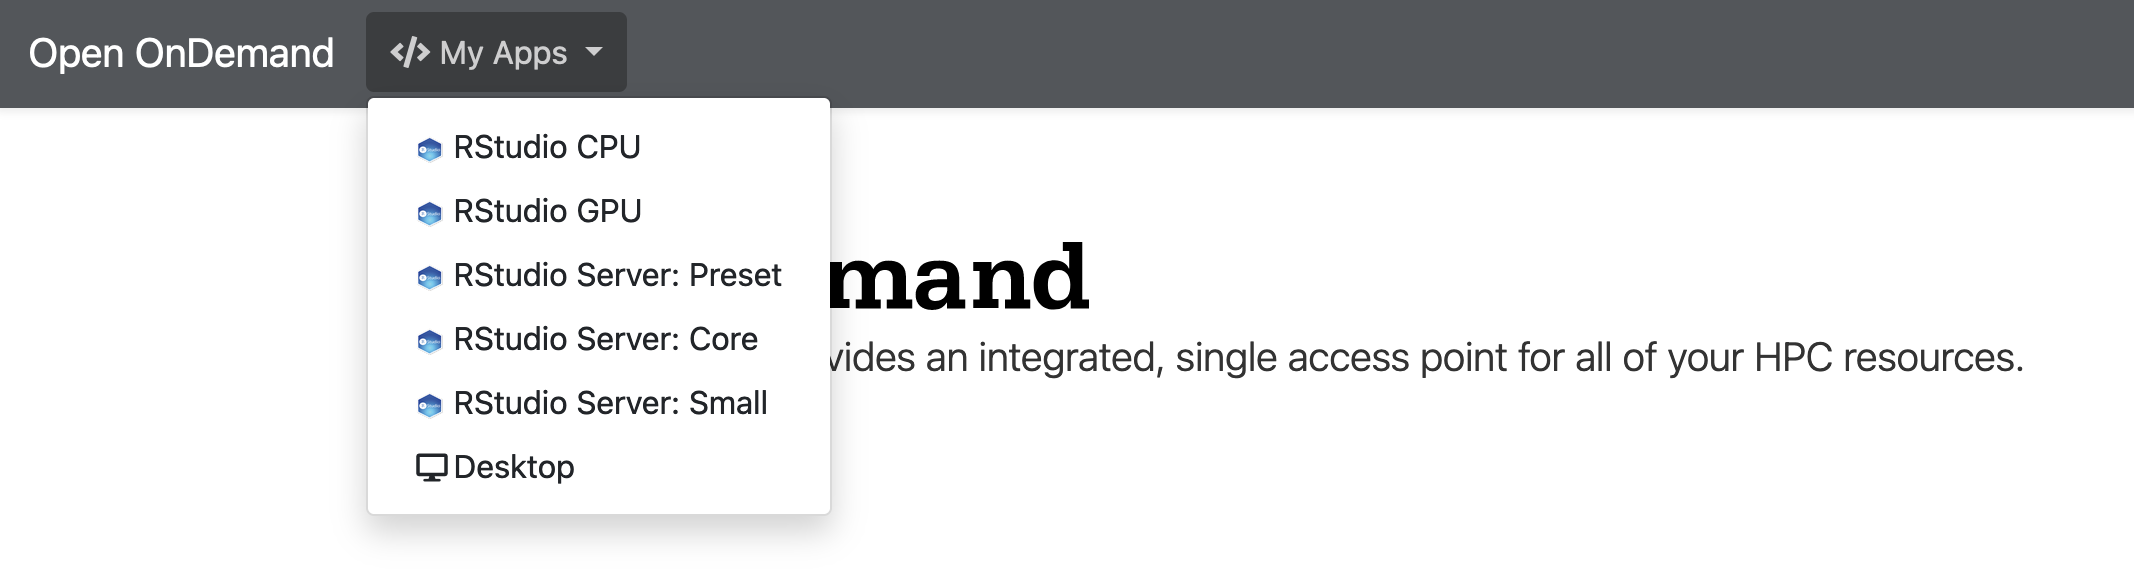
Menus based on applications
You can create drop-down menus based on applications the system can discover.
Menu items are automatically grouped based on the applications subcategory.
Use the apps array to define the app tokens for this navigation menu.
The order of the menu items is based on the order you've defined.
nav_bar:
  - title: "My Apps"
    icon: "fas://window-restore"
    apps:
      - "sys/Rstudio/*"
      - "sys/bc_desktop"

Menus based on links
Menus based on links provide even more granular control on how the drop-down menu is generated.
As seen in the previous sections, using an apps array will automatically generate
sub-menus based on the subcategory of the applications that have been discovered.
When using links, we can override this behavior to provide different titles to the sub-menus, or with no sub-menus and subtitles at all.
Let's look at this example using the same application tokens, but using links instead
of apps. The system will discover and generate list items for the same eight applications,
only without any sub-menus. It is simply a list of all the discovered applications with
no further grouping.
nav_bar:
  - title: "My Apps"
    icon: "fa://code"
    links:
      - "sys/Rstudio/*"
      - "sys/bc_desktop"
To add sub-menus, simply use the group attribute.
When links are used with the group attribute, the discovered applications
will now be grouped and sub-menu titles created based on the configuration provided.
This will look and feel similar to menus-based-on-applications with the exception
being that sub-menus are defined by the group configuration instead of the subcategory
of the applications in the list.
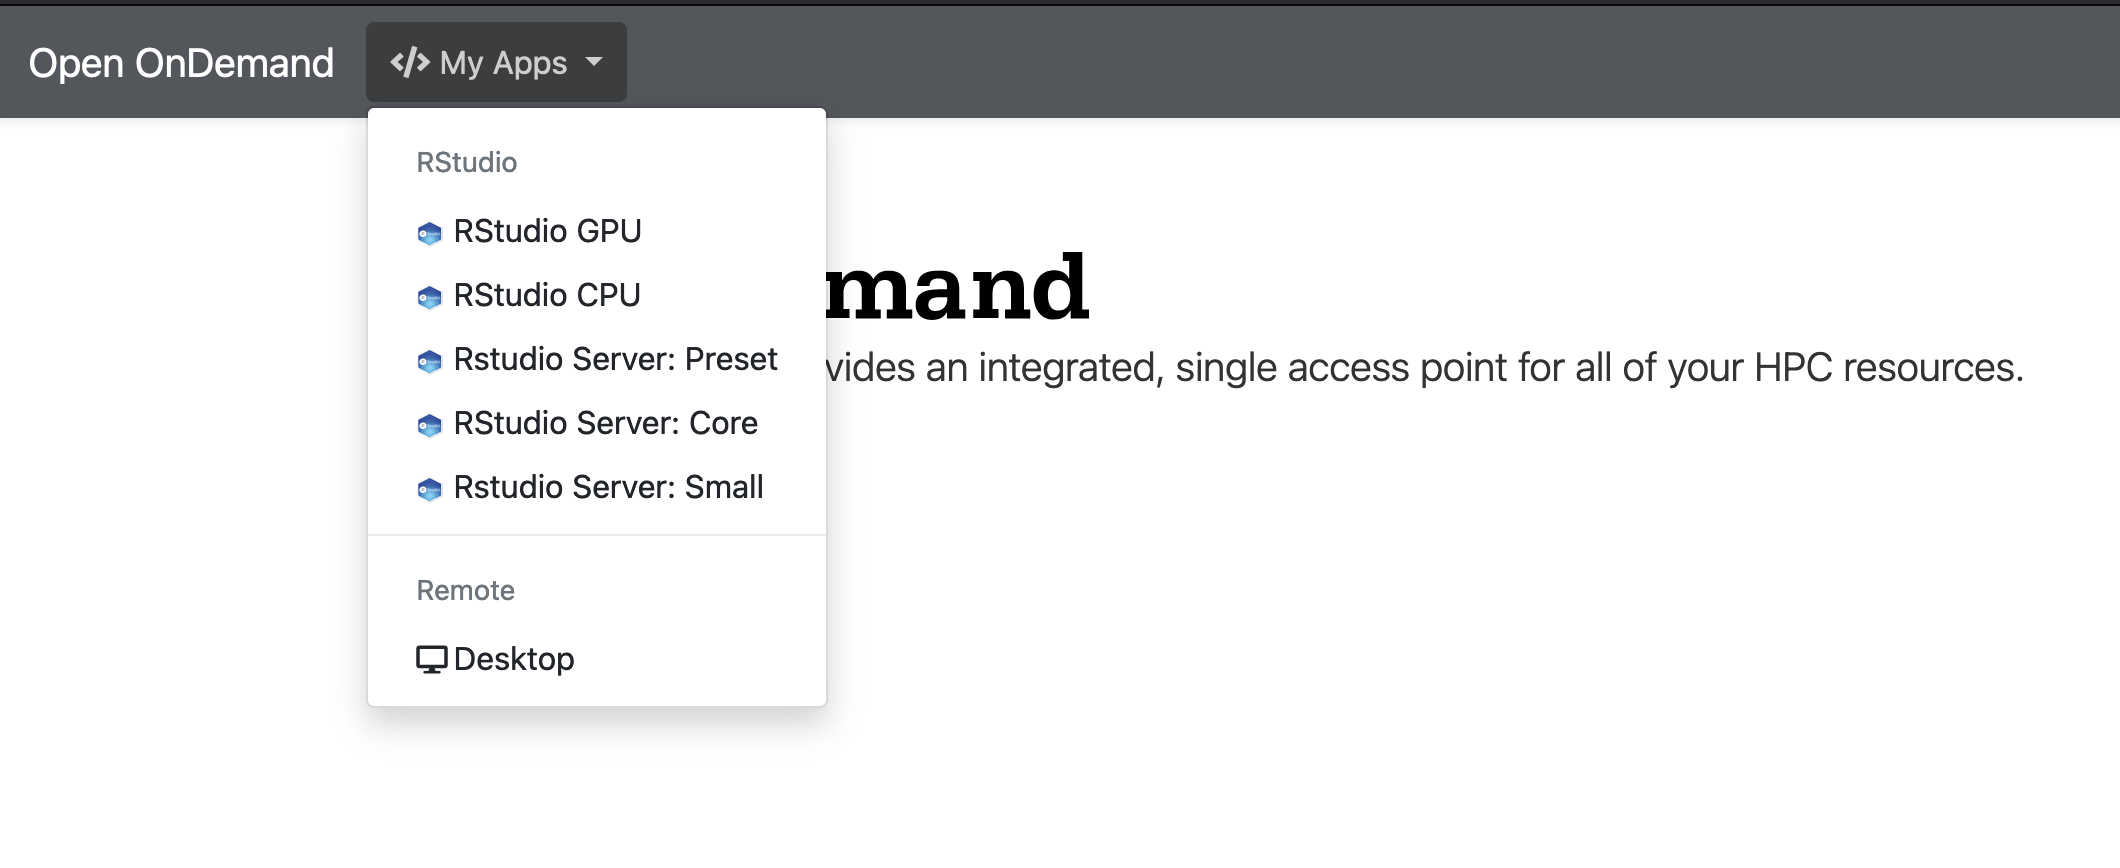
nav_bar:
  - title: "My Apps"
    icon: "fa://code"
    links:
      - group: "RStudio"
      - "sys/Rstudio/*"
      - group: "Remote"
      - "sys/bc_desktop"
Tip
You can also used predefined links (described above) in the links section here.
Menus for URLs
You can even create menu items for relative and absolute URLs to link anywhere
through the url attribute.
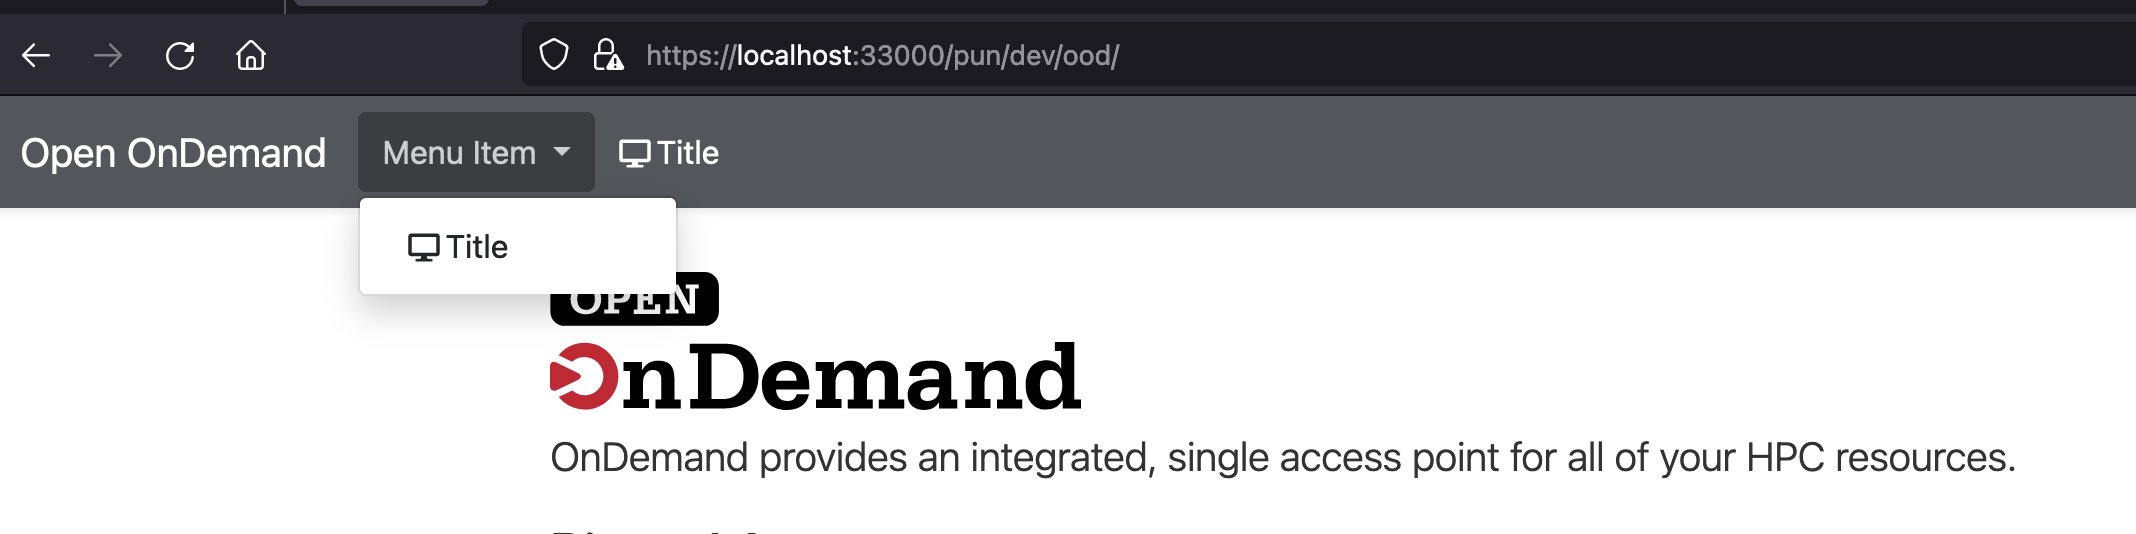
nav_bar:
  # Single top level link
  - title: "Title"
    icon: "fa://desktop" # optional, defaults to fas://cog
    url: "/docs"
    new_tab: true # optional, defaults to false

  # Dropdown menu
  - title: "Menu Item"
    links:
      - title: "Title"
        icon: "fa://desktop" # optional, defaults to fas://cog
        url: "https://openondemand.org/"
        new_tab: true # optional, defaults to false
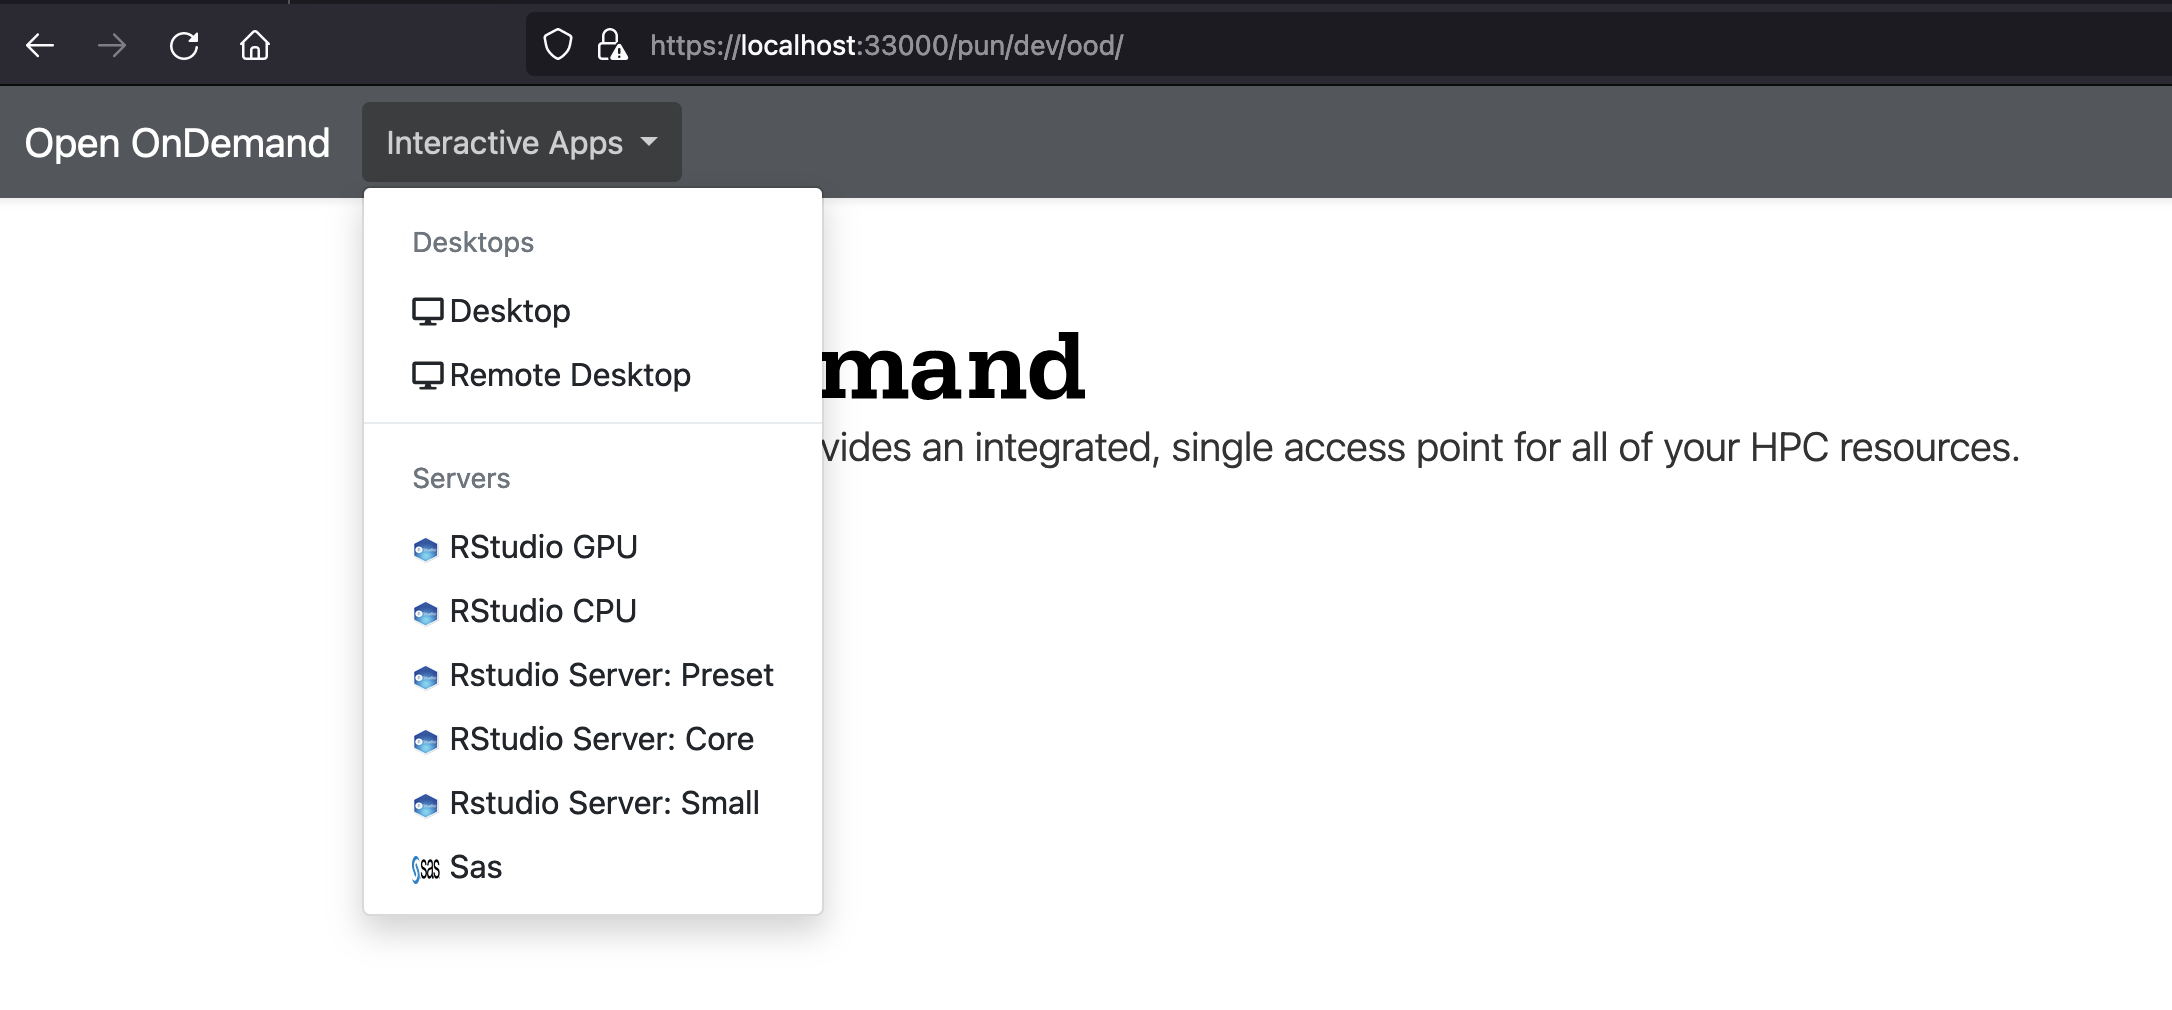
Interactive Apps Menu
To define a custom interactive apps menu, use the configuration property interactive_apps_menu.
The custom menu will replace the Interactive Apps left hand side navigation in the
Interactive Apps and My Interactive Sessions pages.
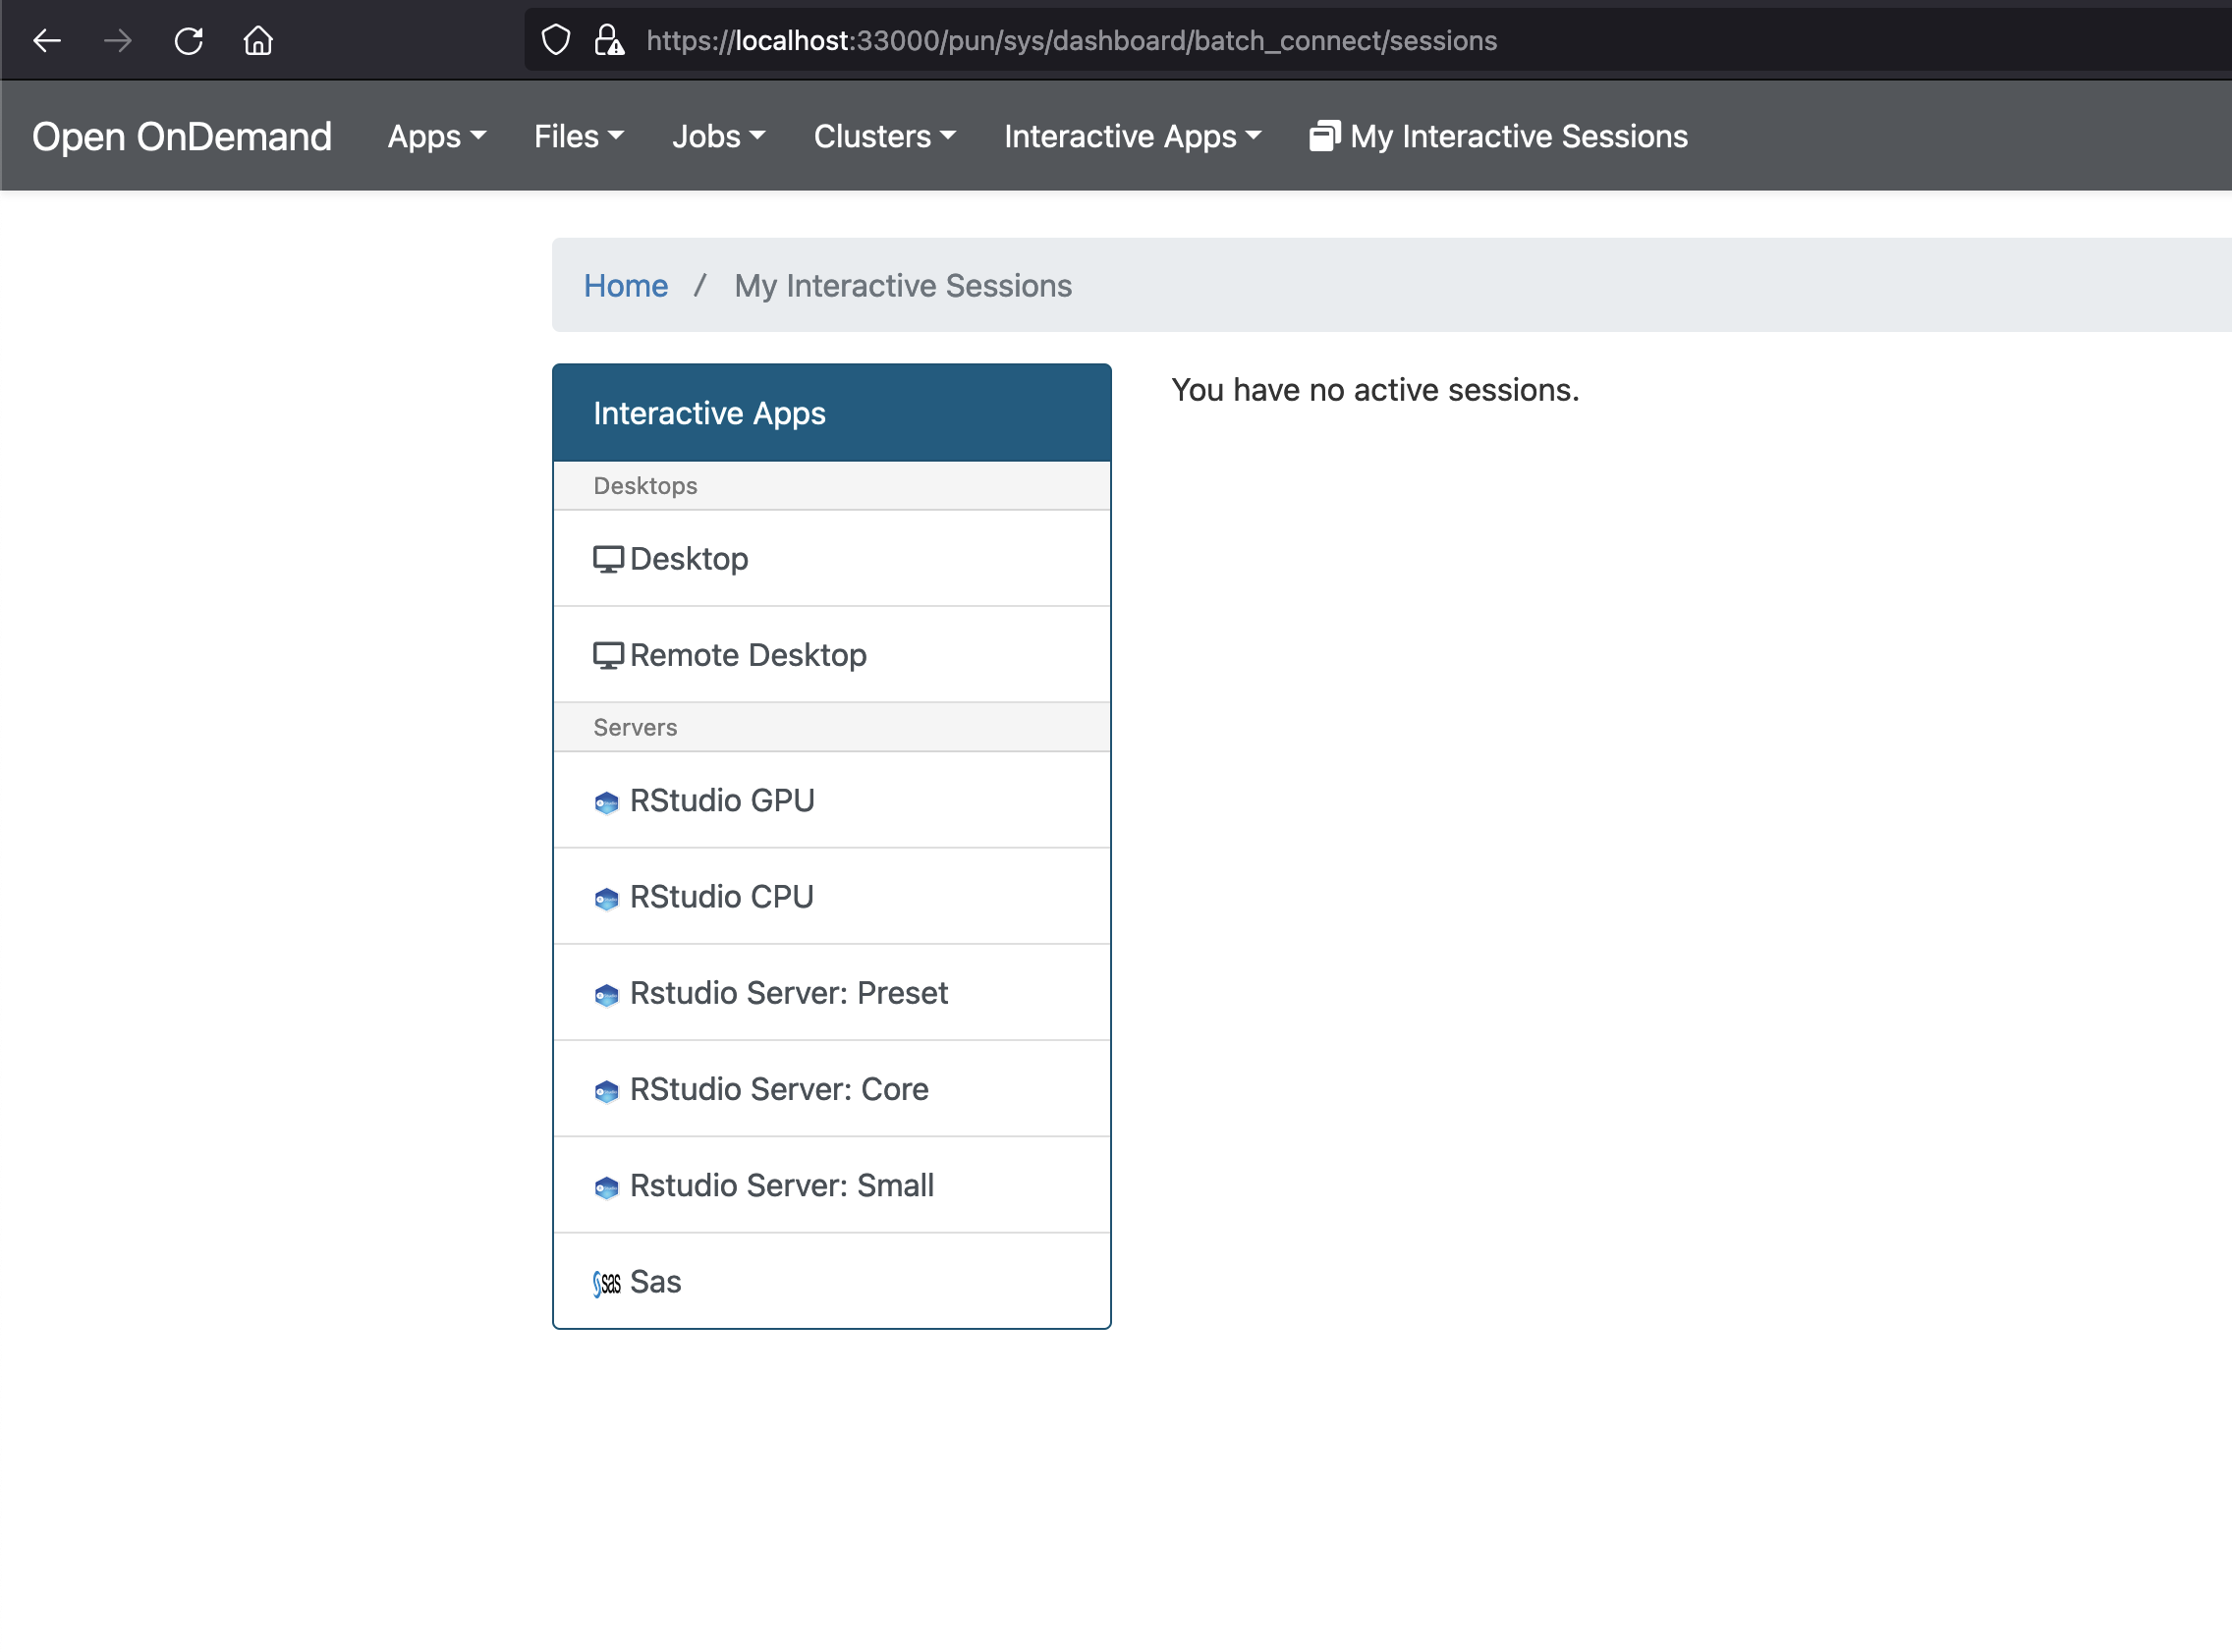
interactive_apps_menu property supports a single navigation item. How to configure navigation items is described in the
Custom Dashboard Navbar section
interactive_apps_menu:
  title: "Custom Apps"
  links:
    - group: "Desktop"
    - apps: "sys/bc_desktop"
    - group: "Servers"
    - apps: "sys/Rstudio/*"
Disable Uploads or Downloads
By default, Open OnDemand will allow users to upload and download files. Both can be disabled through configuration.
Use download_enabled for disabling downloads and upload_enabled for disabling uploads.
Tip
Use File Access Controls (FACLs) on the ondemand.d files to enable or disable uploads or downloads based on group permissions.
Set Upload Limits
By default, the file size upload limit is 10737420000 bytes (~10.7 GB).
If you want set this to a lower value, set the FILE_UPLOAD_MAX configuration
in the file apps' configuration file /etc/ood/config/apps/dashboard/env.
If you want to set it to a higher value set nginx_file_upload_max
in /etc/ood/config/nginx_stage.yml to the desired value. If you have
FILE_UPLOAD_MAX set from above, unset it.
If the values differ, the files app will choose the smaller of the two as the maximum upload limit.
Warning
Both of these configurations are expected to be numbers only (no characters) and in units of bytes. The default value of 10737420000 bytes is ~10.7 GB or ~10.0 Gib.
Values like 1000M or 20G will not be accepted and may cause errors.
If you want to disable file upload altogether, set FILE_UPLOAD_MAX to 0 and leave
the nginx_file_upload_max configuration alone (or comment it out so the default
is used).
Set Download Limits
By default, the maximum file download size is 10.7 GB (10737418240 bytes).
If you wish to change this, you can set the OOD_DOWNLOAD_DIR_MAX configuration environment
variable in the /etc/ood/config/apps/dashboard/env file to the desired value in bytes.
For example, to set the limit to 5 GB, you can add the following line to the /etc/ood/config/apps/dashboard/env file:
OOD_DOWNLOAD_DIR_MAX=5368709120
Note that this will limit the download size for all users of the Open OnDemand instance.
Warning
This configuration value is expected to be numbers only (no characters) and in units of bytes. The default value of 10737418240 bytes is ~10.7 GB or ~10.0 Gib.
Values like 1000M or 20G will not be accepted and may cause errors.
Block or Allow Directory Access
By default, all directories are open and accessible through Open OnDemand (barring POSIX file permissions. Open OnDemand can never read files the user cannot read).
By setting a colon delimited OOD_ALLOWLIST_PATH environment variable, the Job Composer, File Editor, and Files app respect the allowlist in the following manner:
Users will be prevented from navigating to, uploading, downloading, viewing, or editing files that are not an eventual child of the allowed paths.
Users will be prevented from copying a template directory from an arbitrary path in the Job Composer if the arbitrary path that is not an eventual child of the allowed paths.
Users should not be able to get around this using symlinks
We recommend setting this environment variable in /etc/ood/config/nginx_stage.yml as a YAML mapping (key value pairs) in the mapping (hash/dictionary) pun_custom_env i.e. below would a list that allows access to home directories, project space, and scratch space at OSC:
pun_custom_env:
 OOD_ALLOWLIST_PATH: "/users:/fs/project:/fs/scratch"
Warning
This allowlist is not enforced across every action a user can take in an app (including the developer views in the Dashboard). Also, it is enforced via the apps themselves, which is not as robust as using cgroups on the PUN.
Disabling Users
You can use the nginx stage configuration for disabling users
to disable access to specific users based on the users' default shell.
For example you could disable access to Open OnDemand for any user with the /usr/bin/false
default shell.
Set Default SSH Host
Warning
The shell app does not work out of the box because all SSH hosts have to be explicitly allowed through the allowlist (see the section below).
Because there are no hosts configured, no hosts are allowed.
In /etc/ood/config/apps/shell/env set the environment variable OOD_DEFAULT_SSHHOST to change the default ssh host.
Since 1.8, there is no out of the box default (in previous versions it was 'localhost', but this has been removed).
This will control what host the shell app ssh's to when the URL accessed is /pun/sys/shell/ssh/default which is the URL other apps will use (unless there is context to specify the cluster to ssh to).
Since 1.8 you can also set the default ssh host in the cluster configuration as well. Simply add default=true attribute to the login section like the example below.
# /etc/ood/config/clusters.d/my_cluster.yml
---
v2:
  metadata:
    title: "My Cluster"
  login:
    host: "my_cluster.my_center.edu"
    default: true
Set SSH Allowlist
In 1.8 and above we stopped allowing ssh access by default. Now you have explicitly set what hosts users will be allowed to connect to in the shell application.
Every cluster configuration with v2.login.host that is not hidden (it has
v2.metadata.hidden attribute set to true) will be added to this allowlist.
To add other hosts into the allow list (for example compute nodes) add the configuration
OOD_SSHHOST_ALLOWLIST to the /etc/ood/config/apps/shell/env file.
This configuration is expected to be a colon (:) separated list of GLOBs.
Here's an example of this configuration with three such GLOBs that allow for shell access into any compute node in our three clusters.
# /etc/ood/config/apps/shell/env
OOD_SSHHOST_ALLOWLIST="r[0-1][0-9][0-9][0-9].ten.osc.edu:o[0-1][0-9][0-9][0-9].ten.osc.edu:p[0-1][0-9][0-9][0-9].ten.osc.edu"
Enable and configure Shell Ping Pong
Version 3.1 added the ability for the shell application to send and receive ping pong messages to keep the connection alive, and thus the terminal session alive.
The drawback to this is that these persistent connections can actually outlive your authentication timeout settings. Meaning users can have active shell sessions for much longer than your authentication systems would normally allow. This is because the connection was made while you were authenticated and it persists after your session has expired.
So, to keep a conservative security posture, Open OnDemand disables ping pongs by default letting apache timeout these connections more freely.
In addition to enabling or disabling ping pongs, there are other settings you may wish to change.
All of these configurations are environment variables are to be placed in
/etc/ood/config/apps/shell/env.
Setting OOD_SHELL_PING_PONG to anything will enable ping pongs. Removing it or
commenting it out will disable ping pongs (it's disabled by default).
OOD_SHELL_INACTIVE_TIMEOUT_MS controls how long a connection can be inactive
for (in milliseconds) before being closed. It defaults to 300000 milliseconds (5 minutes).
Activity here is counted as actual user activity. Automatic ping pong activity to keep the TCP
connection alive is not factored into this.
OOD_SHELL_MAX_DURATION_MS controls how long a connection can exist regardless
of activity (in milliseconds). After this duration, the connection will be closed
regardless of activity. Its default is 3600000 milliseconds (1 hour).
# /etc/ood/config/apps/shell/env

OOD_SHELL_INACTIVE_TIMEOUT_MS=300000
OOD_SHELL_MAX_DURATION_MS=3600000
# OOD_SHELL_PING_PONG=false
Set OOD SSH Port
As of version 2.1 you are allowed to configure a non-standard ssh port.
To change the ssh port for submitting jobs in OOD, you need to add the configuration
OOD_SSH_PORT to the /etc/ood/config/apps/dashboard/env file.
Here's an example of this configuration.
# /etc/ood/config/apps/dashboard/env
OOD_SSH_PORT="2222"
Shell App SSH Command Wrapper
Since OOD 1.7 you can use an ssh wrapper script in the shell application instead of just the ssh command.
This is helpful when you pass additional environment variable through ssh (-o SendEnv=MY_ENV_VAR) or ensure some ssh command options be used.
To use your ssh wrapper configure OOD_SSH_WRAPPER=/usr/bin/changeme in /etc/ood/config/apps/shell/env to point to your script. Also be sure to make your script executable.
Here's a simple example of what a wrapper script could look like.
#!/bin/bash

args="-o SendEnv=MY_ENV_VAR"

exec /usr/bin/ssh "$args" "$@"
Custom Job Composer Templates
Below explains how job templates work for the Job Composer and how you can add your own. Here is an example of the templates we use at OSC for the various clusters we have
Job Templates Overview
"Job Composer" attempts to model a simple but common workflow. When creating a new batch job to run a simulation a user may:
copy the directory of a job they already ran or an example job
edit the files
submit a new job
"Job Composer" implements these steps by providing the user job template directories and the ability to make copies of them: (1) Copy a directory, (2) Edit the files, and (3) Submit a new job.
Copy a directory of a job already ran or an example job
User can create a new job from a "default" template. A custom default template can be defined at
/etc/ood/config/apps/myjobs/templates/defaultor under the app deployment directory at/var/www/ood/apps/sys/myjobs/templates/default. If no default template is specified, the default is/var/www/ood/apps/sys/myjobs/example_templates/torqueuser can select a directory to copy from a list of "System" templates the admin copied to
/etc/ood/config/apps/myjobs/templatesor under the app deployment directory at/var/www/ood/apps/sys/myjobs/templatesduring installationuser can select a directory to copy from a list of "User" templates that the user has copied to
$HOME/ondemand/data/sys/myjobs/templatesuser can select a job directory to copy that they already created through "Job Composer" from
$HOME/ondemand/data/sys/myjobs/projects/default
Edit the files
user can open the copied job directory in the File Explorer and edit files using the File Editor
Submit a new job
user can use the Job Options form specify which host to submit to, what file is the job script
user can use the web interface to submit the job to the batch system
after the job is completed, the user can open the directory in the file explorer to view results
Job Template Details
A template consists of a folder and a manifest.yml file.
The folder contains files and scripts related to the job.
The manifest contains additional metadata about a job, such as a name, the default host, the submit script file name, and any notes about the template.
name: A Template Name
host: ruby
script: ruby.sh
notes: Notes about the template, such as content and function.
In the event that a job is created from a template that is missing from the manifest.yml, "Job Composer" will assign the following default values:
nameThe name of the template folder.hostThe cluster id of the first cluster with a valid resource_mgr listed in the OOD cluster configuration.scriptThe first.shfile appearing in the template folder.notesThe path to the location where a template manifest should be located.
Job Composer Script Size Limit
Since 1.7 the Job composer shows users 'Suggested file(s)' and 'Other valid file(s)'. Other valid files are
_any_ files less than OOD_MAX_SCRIPT_SIZE_KB which defaults to 65 (meaning 65kb).
To reconfigure this, simply set the environment variable in the job composers' environment file
/etc/ood/config/apps/myjobs/env like so:
# show any file less than or equal to 15 kb
OOD_MAX_SCRIPT_SIZE_KB=15
Hiding Job Arrays
When composing a new job, the job arrays field is shown on supported clusters. To Hide this field even on supported clusters, an option was added.
To reconfigure this, simply set the environment variable in the job composers' environment file
/etc/ood/config/apps/myjobs/env like so:
# Don't show job arrays field even on supported clusters
OOD_HIDE_JOB_ARRAYS=True
Custom Error Page for Missing Home Directory on Launch
Some sites have the home directory auto-create on first ssh login, for example
via pam_mkhomedir.so. This introduces a problem if users first access the system
through OnDemand, which expects the existence of a user’s home directory.
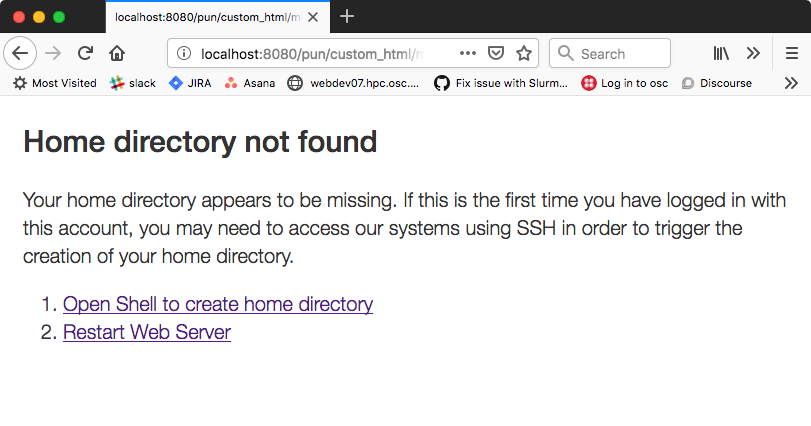
In OnDemand <= 1.3 if the user's home directory was missing a non-helpful single
string error would display. Now a friendly error page displays. This error page
can be customized by adding a custom one to /etc/ood/config/pun/html/missing_home_directory.html.
The default error page looks like this:

An example of a custom error page has been provided at /opt/ood/nginx_stage/html/missing_home_directory.html.example.pam_mkhomedir and can be copied to /etc/ood/config/pun/html/missing_home_directory.html. This example directs the user to first click a link to open the shell app which will create the home directory. The shell app's default host must be configured to be a host that is appropriate for this purpose. The custom error page looks like this:
See this Discourse discussion for details.
Pinning Applications to the Dashboard
In version 2.0 you can now pin app Icons to the dashboard that link to the application form.
When configured a widget like the one below will appear on the dashboard's landing page.
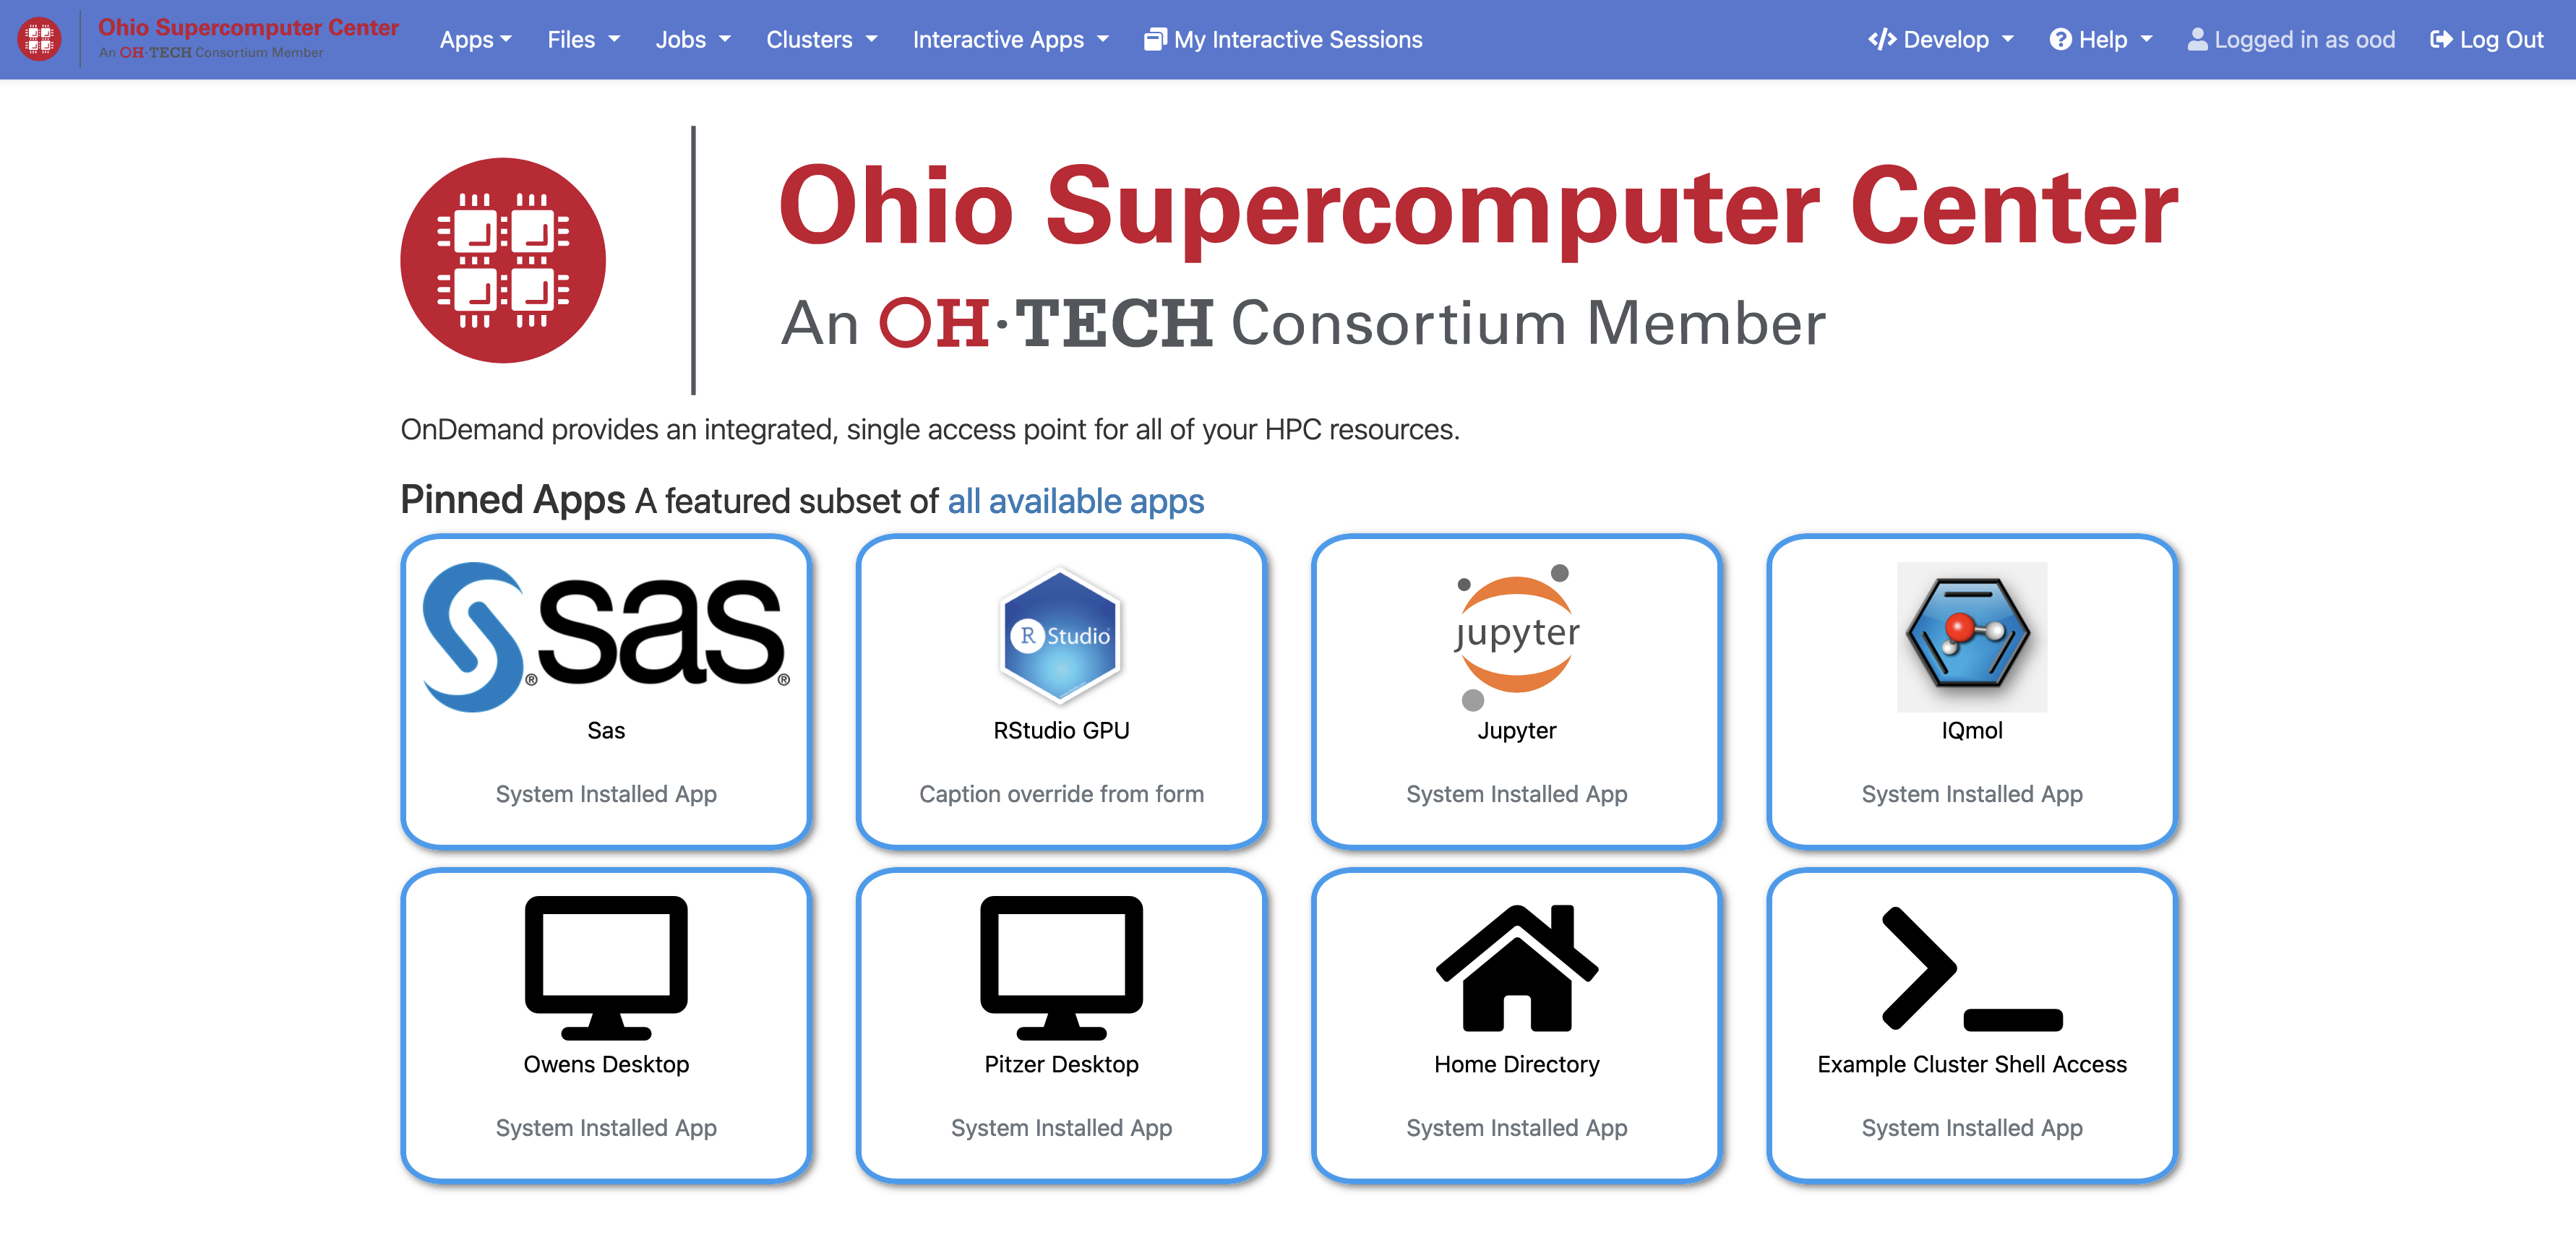
The configuration for what apps to pin allows for three variants.
You can configure specific apps with a string of the type router/app_name.
For example sys/jupyter is the system installed app named jupyter.
Secondly you can configure globs like sys/* to pin all system installed apps. Or
Maybe sys/minimal_* to pin all system installed apps that begin with 'minimal'.
Lastly you can choose to pin apps based off of fields in their manifest.yml file.
You can match by type, category, subcategory and metadata fields. These matches are
cumulative. Meaning an app has to match all of these to be pinned. In the examples below
there is a configuration of type sys and category minimal. This configuration will only pin
system installed apps that are in the minimal category. An app has to meet both these
criteria to be pinned to the dashboard.
Full examples are below:
# /etc/ood/config/ondemand.d/ondemand.yml
pinned_apps:
  - sys/jupyter           # pin a specific system installed app called 'jupyter'

  - sys/bc_desktop/desk1  # pinned desktop app must contain exact desktop name - 'desk1'

  - 'sys/*'               # pin all system install apps. This also works for usr/* and dev/*

  - category: 'minimal'   # pin all the apps in the 'minimal' category

  - type: sys             # pin all system installed apps in the minimal category.
    category: 'minimal'

  # pin all system installed apps in the minimal category and the
  # class instruction subcategory
  - type: sys
    category: 'minimal'
    subcategory: 'class_instruction'

  # pin all system installed apps in the minimal category, the
  # class instruction subcategory and the metadata field 'field_of_science'
  # with an exact match on biology
  - type: sys
    category: 'minimal'
    subcategory: 'class_instruction'
    field_of_science: 'biology'

  # pin any app with an exact match on the metadata field_of_science of biology
  - field_of_science: 'biology'

  # pin any app with a glob match *bio* on the metadata field_of_science
  - field_of_science: '*bio*'
Administrators can also configure the pinned apps to be grouped by any field
in the manifest.yml including metadata fields with the pinned_apps_group_by
configuration.
This will create a row and a heading for each group like so (the image was generated from grouping by category):

One can also change the menu length in the 'App's menu item. If you've pinned more than 6 apps and you want to them to show up in this drop-down list, simply increase the length with the option below.
# /etc/ood/config/ondemand.d/ondemand.yml
pinned_apps_menu_length: 6        # the default number of items in the drop-down menu list
pinned_apps_group_by: category    # defaults to nil, no grouping
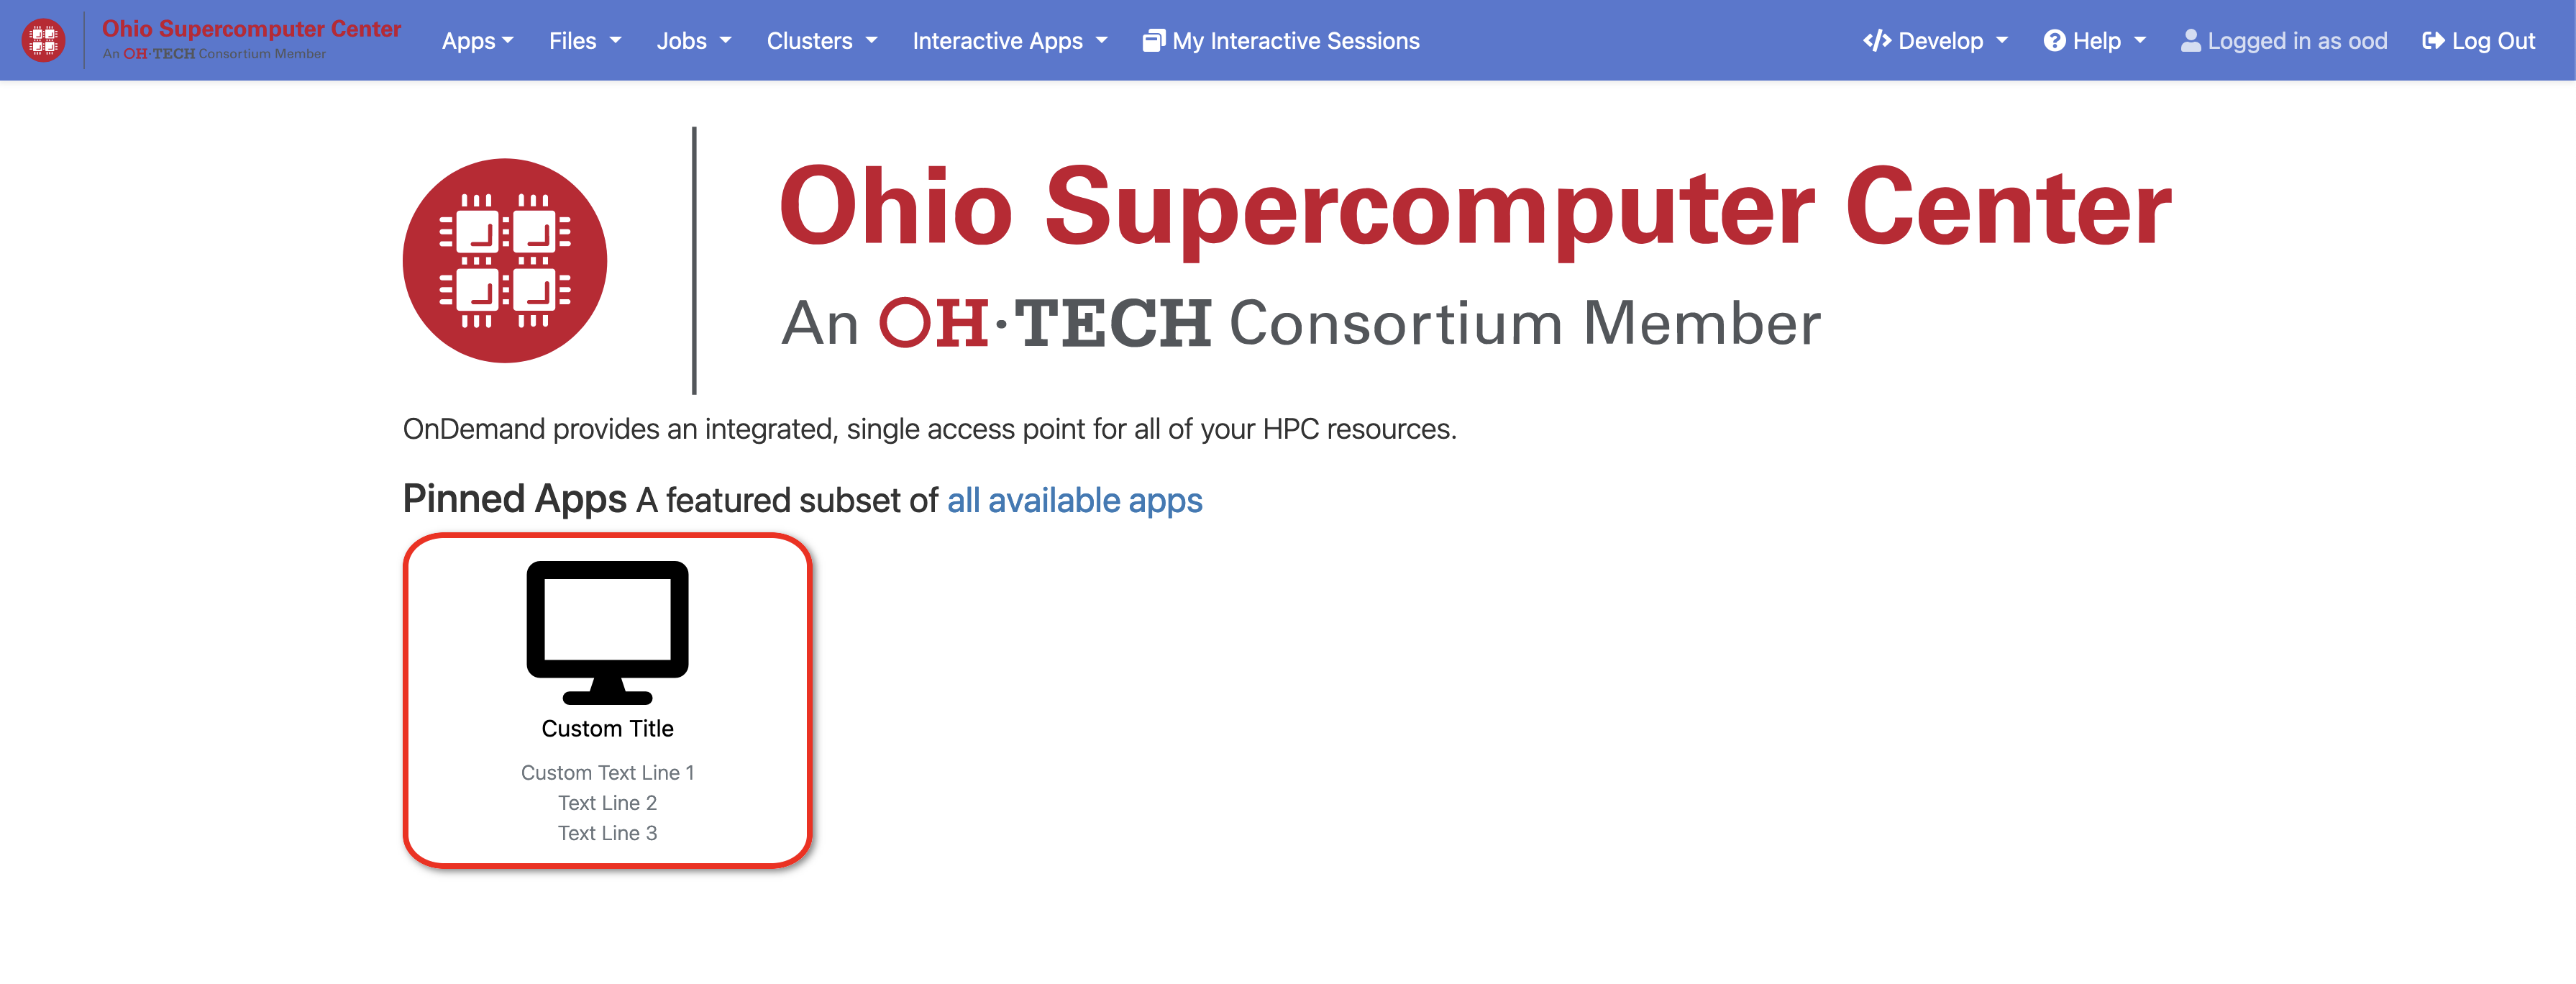
Pinned Apps customizations
To customize the text, icon, or color of the pinned app tile,
use the tile configuration property in the application manifest or form.
The form values will take precedence over any set in the manifest.
All the values are optional and any set will override the default from the application.
tile:
  title: "Custom Title"
  icon: fa://desktop
  border_color: "red"
  sub_caption: |
    Custom Text Line 1
    Text Line 2
    Text Line 3
The CSS for the pinned app tiles has been optimized to support up to three lines of text for the sub_caption property.
Custom layouts in the dashboard
Administrators can now customize what widgets appear on the dashboard and how they're laid out on the page.
In it's simplest form this feature allows for a rearrangement of existing widgets. As of 4.0.8 the existing widgets are:
pinned_apps- Pinned Apps described aboverecently_used_apps- the four most recently used interactive applications. Launching these applications will start a new interactive session with the previously submitted parameters.sessions- the three most recent active interactive sessionsmotd- the Message of the Dayxdmod_widget_job_efficiency- the XDMoD widget for job efficiencyxdmod_widget_jobs- the XDMoD widget for job informationsaved_settings- all of the batch connect saved settings displayed as cards
This feature also allows for administrators to add custom widgets.
Simply drop new files into /etc/ood/config/apps/dashboard/views/widgets and reference them
in the configuration. These partial files can be any format Rails recognizes, notably .html or
.html.erb extensions.
Also if you use sub-directories under widgets, they can be referenced by relative paths. For example
views/widgets/cluster/_my_cluster_widget.html.erb would be referenced in the configuration
as cluster/my_cluster_widget.
Warning
Rails expects files to be prefixed with an underscore. For example if you configured my_new_widget
the filename should be _my_new_widget.html.
Without setting this configuration, the dashboard will arrange itself depending on what features are enabled. For example if both pinned apps and XDMoD features are enabled it will arrange itself accordingly based on a default layout.
Here's the default configuration when all of these features are enabled.
# /etc/ood/config/ondemand.d/ondemand.yml
dashboard_layout:
  rows:
    - columns:
      - width: 8
        widgets:
          - pinned_apps
          - motd
      - width: 4
        widgets:
          - xdmod_widget_job_efficiency
          - xdmod_widget_jobs
rows are an array of row elements. Each row element has a columns field which is an array
column elements. Each column element two fields. A width field that specifies the width in the
bootstrap grid layout which defaults to 12 columns in total. It also has a widgets field which
is an array of existing or newly added widgets to render in that column.
Customize Text in OnDemand
Using Rails support for Internationalization (i18n), we have internationalized many strings in the Dashboard and the Job Composer apps.
Initial translation dictionary files with defaults that work well for OSC and using the English locale (en) have been added (/var/www/ood/apps/sys/dashboard/config/locales/en.yml and /var/www/ood/apps/sys/myjobs/config/locales/en.yml). Sites wishing to modify these strings in order to provide site specific replacements for English, or use a different locale altogether, should do the following:
Copy the translation dictionary file (or create a new file with the same structure of the keys you want to modify) to
/etc/ood/config/locales/en.ymland modify that copy.If you want apps to look for these dictionary files in a different location than
/etc/ood/config/locales/en.ymlyou can change the location by definingOOD_LOCALES_ROOTenvironment variable.The default locale is "en". You can use a custom locale. For example, if you want the locale to be French, you can create a
/etc/ood/config/locales/fr.ymland then configure the Dashboard to use this locale by setting the environment variableOOD_LOCALE=frwhere the locale is just the name of the file without the extension. Do this in either thenginx_stageconfiguration or in the Dashboard and Job Composer environment configuration file.
In each default translation dictionary file the values that are most site-specific (and thus relevant for change) appear at the top.
File path |
App |
Translation namespace |
|---|---|---|
|
|
|
|
|
|
|
All localize-able apps will check this path, unless |
Any |
Warning
Translations have certain variables passed to them for example %{support_url}. Those variables may be used or removed from the translation. Attempting to use a variable that is not available to the translation will crash the application.
Note
Localization files are YAML documents; remember that YAML uses spaces for indentation NOT tabs per the YAML spec.
Note
OnDemand uses the convention that translations that accept HTML with be suffixed with _html. Any other translation will be displayed as plain text.
Change the Dashboard Tagline
en:
  dashboard:
    welcome_html: |
      %{logo_img_tag}
      <p class="lead">OnDemand provides an integrated, single access point for all of your HPC resources.</p>
    motd_title: "Message of the Day"
The welcome_html interpolates the variable logo_img_tag with the default
logo, or the logo specified by the environment variable OOD_DASHBOARD_LOGO.
You may omit this variable in the value you specify for welcome_html if you prefer.
Change quota messages in the Dashboard
Two messages related to file system usage that sites may want to change:
quota_additional_message- gives the user advice on what to do if they see a quota warning
quota_reload_message- tells the user that they should reload the page to see their quota usage change, and by default also tells users that the quota values are updated every 5 minutes
Customize Text in the Job Composer's options form
The OSC default value for options_account_help says that the account field is optional unless a user is a member of multiple projects.
Items of note include what to call Accounts which might also be Charge Codes, or Projects. At OSC entering an account is optional unless a user is a member of multiple projects which is reflected in the default value for the string options_account_help.
Disk Quota Warnings on Dashboard
You can display warnings to users on the Dashboard if their disk quota is nearing its limit. This requires an auto-updated (it is recommended to update this file every 5 minutes with a cronjob) JSON file that lists all user quotas. The JSON schema for version 1 is given as:
{
  "version": 1,
  "timestamp": 1525361263,
  "quotas": [
    {},
    {}
  ]
}
Where version defines the version of the JSON schema used, timestamp
defines when this file was generated, and quotas is a list of quota objects
(see below).
You can configure the Dashboard to use this JSON file (or files) by setting the
environment variable OOD_QUOTA_PATH as a colon-delimited list of all JSON
file paths in the /etc/ood/config/apps/dashboard/env file. In addition to
pointing to files OOD_QUOTA_PATH may also contain HTTP(s) or FTP protocol
URLs. Colons used in URLs are correctly handled and are not treated as delimiters.
Warning
Sites using HTTP(s) or FTP for their quota files may see slower dashboard load times, depending on the responsiveness of the server providing the quota file(s).
The default threshold for displaying the warning is at 95% (0.95), but this
can be changed with the environment variable OOD_QUOTA_THRESHOLD.
An example is given as:
# /etc/ood/config/apps/dashboard/env

OOD_QUOTA_PATH="/path/to/quota1.json:https://example.com/quota2.json"
OOD_QUOTA_THRESHOLD="0.80"
Individual User Quota
If the quota is defined as a user quota, then it applies to only disk
resources used by the user alone. This is the default type of quota object and
is given in the following format:
{
  "type": "user",
  "block_limit": 5000000,
  "file_limit": 1000000,
  "path": "/path/to/volume2",
  "total_block_usage": 400000,
  "total_file_usage": 1000,
  "user": "user1"
}
Warning
A block must be equal to 1 KiB for proper conversions.
Individual File-set Quota
If the quota is defined as a fileset quota, then it applies to all disk
resources used underneath a given volume. This requires the object to be
repeated for each user that uses disk resources under this given volume.
The format is given as:
{
  "type": "fileset",
  "user": "user1",
  "path": "/path/to/volume2",
  "block_usage": 500,
  "total_block_usage": 1000,
  "block_limit": 2000,
  "file_usage": 1,
  "total_file_usage": 5,
  "file_limit": 10
}
Where block_usage and file_usage are the disk resource usages attributed to
the specified user only.
Note
For each user with resources under this fileset, the above object will be repeated with just user, block_usage, and file_usage changing.
Balance Warnings on Dashboard
You can display warnings to users on the Dashboard if their resource balance is nearing its limit. This requires an auto-updated (it is recommended to update this file daily with a cronjob) JSON file that lists all user balances. The JSON schema for version 1 is given as:
{
  "version": 1,
  "timestamp": 1525361263,
  "config": {
    "unit": "RU",
    "project_type": "project"
  },
  "balances": [
    {},
    {}
  ]
}
Where version defines the version of the JSON schema used, timestamp
defines when this file was generated, and balances is a list of quota objects
(see below).
The value for config.unit defines the type of units for balances and
config.project_type would be project, account, or group, etc.
Both values are used in locales and can be any string value.
You can configure the Dashboard to use this JSON file (or files) by setting the
environment variable OOD_BALANCE_PATH as a colon-delimited list of all JSON
file paths.
Warning
Sites using HTTP(s) or FTP for their balance files may see slower dashboard load times, depending on the responsiveness of the server providing the quota file(s).
The default threshold for displaying the warning is at 0, but this
can be changed with the environment variable OOD_BALANCE_THRESHOLD.
An example is given as:
# /etc/ood/config/apps/dashboard/env

OOD_BALANCE_PATH="/path/to/balance1.json:/path/to/balance2.json"
OOD_BALANCE_THRESHOLD=1000
User Balance
If the balance is defined as a user balance, then it applies to only that user. Omit the project key:
{
  "user": "user1",
  "value": 10
}
Project Balance
If the balance is defined as a project balance, then it applies to a project/account/group, whatever is defined for config.project_type:
{
  "user": "user1",
  "project": "project1",
  "value": 10
}
Maintenance Mode
As an administrator you may want to have some downtime of the Open OnDemand service for various reasons, while still telling your customers that the downtime is expected.
You can do this by setting Open OnDemand in 'Maintenance Mode'.
While Maintenance mode is active, Apache will not serve requests for paths outside the
/public/maintenance/* wildcard. Instead, it will serve the /var/www/ood/public/maintenance/index.html
file, which you can change or brand to be your own. Changes to this file will persist through upgrades.
Any assets (e.g., images, stylesheets, or JavaScript) needed by the HTML file should be placed
in the /var/www/ood/public/maintenance/ directory. You can also put symbolic links into the
/var/www/ood/public/maintenance/ directory, if you want to reuse assets located elsewhere in your
file system.
While in maintenance mode, Apache returns the HTML file and a 503 response code to all users whose IP does not match one of the configured allowlist regular expressions. The allowlist is to allow staff, localhost or a subset of your users access while restricting others.
In this example we allow access to anyone from 192.168.1..* which is the 192.168.1.0/24 CIDR and
the single IP '10.0.0.1'.
These are the settings you'll need for this functionality.
# /etc/ood/config/ood_portal.yml
use_rewrites: true
use_maintenance: true
maintenance_ip_allowlist:
  # examples only! Your ip regular expressions will be specific to your site.
  - '192.168.1..*'
  - '10.0.0.1'
To start maintenance mode (and thus start serving this page) simply touch /etc/ood/maintenance.enable
to create the necessary file. When your downtime is complete just remove the file and all the
traffic will be served normally again. The existence of this file is what starts or stops maintenance
mode, not it's content, so you will not need to restart apache or modify it's configuration files for this to
take affect.
Grafana support
It's possible to display Grafana graphs within the ActiveJobs app when a user expands a given job.
Grafana must be configured to support embedded panels and at this time it is also required to have an anonymous organization. Below are configuration options are needed to support displaying Grafana panels in ActiveJobs. Adjust org_name to match whatever organization you wish to be anonymous.
Warning
Changing a Grafana install to support anonymous access can cause unintended consequences for how authenticated users interact with Grafana. It's recommended to test anonymous access on a non-production Grafana install if you do not already support anonymous access.
[auth.anonymous]
enabled = true
org_name = Public
org_role = Viewer

[security]
allow_embedding = true
The dashboard used by OSC is the OnDemand Clusters dashboard.
Settings used to access Grafana are configured in the cluster configuration. The following is an example from OSC:
custom:
  grafana:
    host: "https://grafana.osc.edu"
    orgId: 3
    dashboard:
      name: "ondemand-clusters"
      uid: "aaba6Ahbauquag"
      panels:
        cpu: 20
        memory: 24
    labels:
      cluster: "cluster"
      host: "host"
      jobid: "jobid"
    cluster_override: "mysite"
When viewing a dashboard in Grafana choose the panel you'd wish to display and select Share. Then choose the Embed tab which will provide you with the iframe URL that will need to be generated within OnDemand. The time ranges and values for labels (e.g.: var-cluster=) will be auto-filled by OnDemand.
orgIdis theorgIdquery parameterThe dashboard
nameis the last segment of the URI before query parametersThe
uidis the UID portion of URL that is unique to every dashboardThe
panelIdquery parameter will be used as the value for eithercpuormemorydepending on the panel you have selectedThe values for
labelsare how OnDemand maps labels in Grafana to values expected in OnDemand. Thejobidkey is optional, the others are required.The
cluster_overridecan override the cluster name used to make requests to Grafana if the Grafana cluster name varies from OnDemand cluster name.
Disable Host Link in Batch Connect Session Card
Batch connect session cards like this have links to the compute node on which the job is currently running (highlighted).
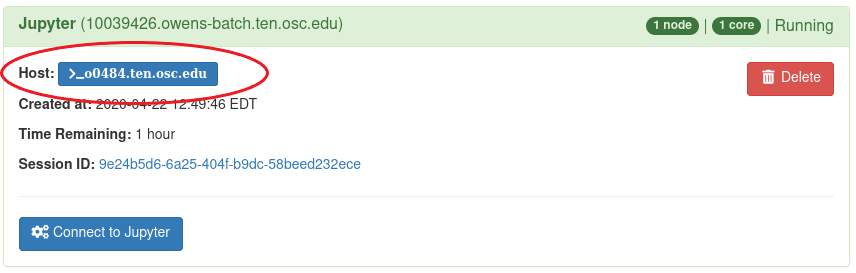
However, some sites may want to disable this feature because they do not allow ssh sessions on the compute nodes.
To disable this, simply set the environment variable in the dashboards' environment file
/etc/ood/config/apps/dashboard/env to a falsy value (0, false, off).
# don't show ssh link in batch connect card
OOD_BC_SSH_TO_COMPUTE_NODE=off
If you wish to disable on a per-cluster basis, you can set the following in your cluster YAML configuration.
v2:
   # ...
   batch_connect:
     ssh_allow: false
Set Illegal Job Name Characters
If you encounter an issue in running batch connect applications complaining about invalid job names like the error below.
Unable to read script file because of error: ERROR! argument to -N option must not contain /
To resolve this set OOD_JOB_NAME_ILLEGAL_CHARS to / for all OOD applications in the
pun_custom_env attribute of the /etc/ood/config/nginx_stage.yml file.
# /etc/ood/config/nginx_stage.yml
pun_custom_env:
  OOD_JOB_NAME_ILLEGAL_CHARS: "/"
Customize Dex Theme
It's possible to use a customized theme when authenticating with Dex when using OnDemand's default authentication. Refer to the upstream Dex template docs for additional information on templating Dex.
The simplest approach is to copy the OnDemand theme and make changes. This is idea if you wish to make the following changes:
Change navigation or login page logos
Change favicon
Change CSS styles
cp -r /usr/share/ondemand-dex/web/themes/ondemand /usr/share/ondemand-dex/web/themes/mycenter
To update the theme you must modify /etc/ood/config/ood_portal.yml and regenerate the Dex configuration:
dex:
# ...
  frontend:
    theme: mycenter
The default ondemand theme can also be configured using the following configuration keys within /etc/ood/config/ood_portal.yml:
dex:
# ...
  frontend:
    issuer: "MyCenter OnDemand"
    extra:
      navLogo: "/public/nav-logo.png"
      loginLogo: "/public/logo.png"
      loginTitle: "Log in with your Center username and password"
      loginButtonText: "Log in with your Center account"
      usernamePlaceholder: "center-username"
      passwordPlaceholder: "center-password"
      loginAlertMessage: "Login services will be down during center maintenance between 8:00 AM EST and 10:00 AM EST"
      loginAlertType: "warning"
Changes are applied by running update_ood_portal and restarting the ondemand-dex service.
sudo /opt/ood/ood-portal-generator/sbin/update_ood_portal
sudo systemctl restart ondemand-dex.service
XDMoD Integration
XDMoD Integration requires XDMoD 9+, OnDemand 1.8+, and the ability to facilitate single sign on between the two services. Currently this has been demonstrated to work using OpenID Connect via Keycloak as well as a modified instance of Dex Identity Provider to support sessions.
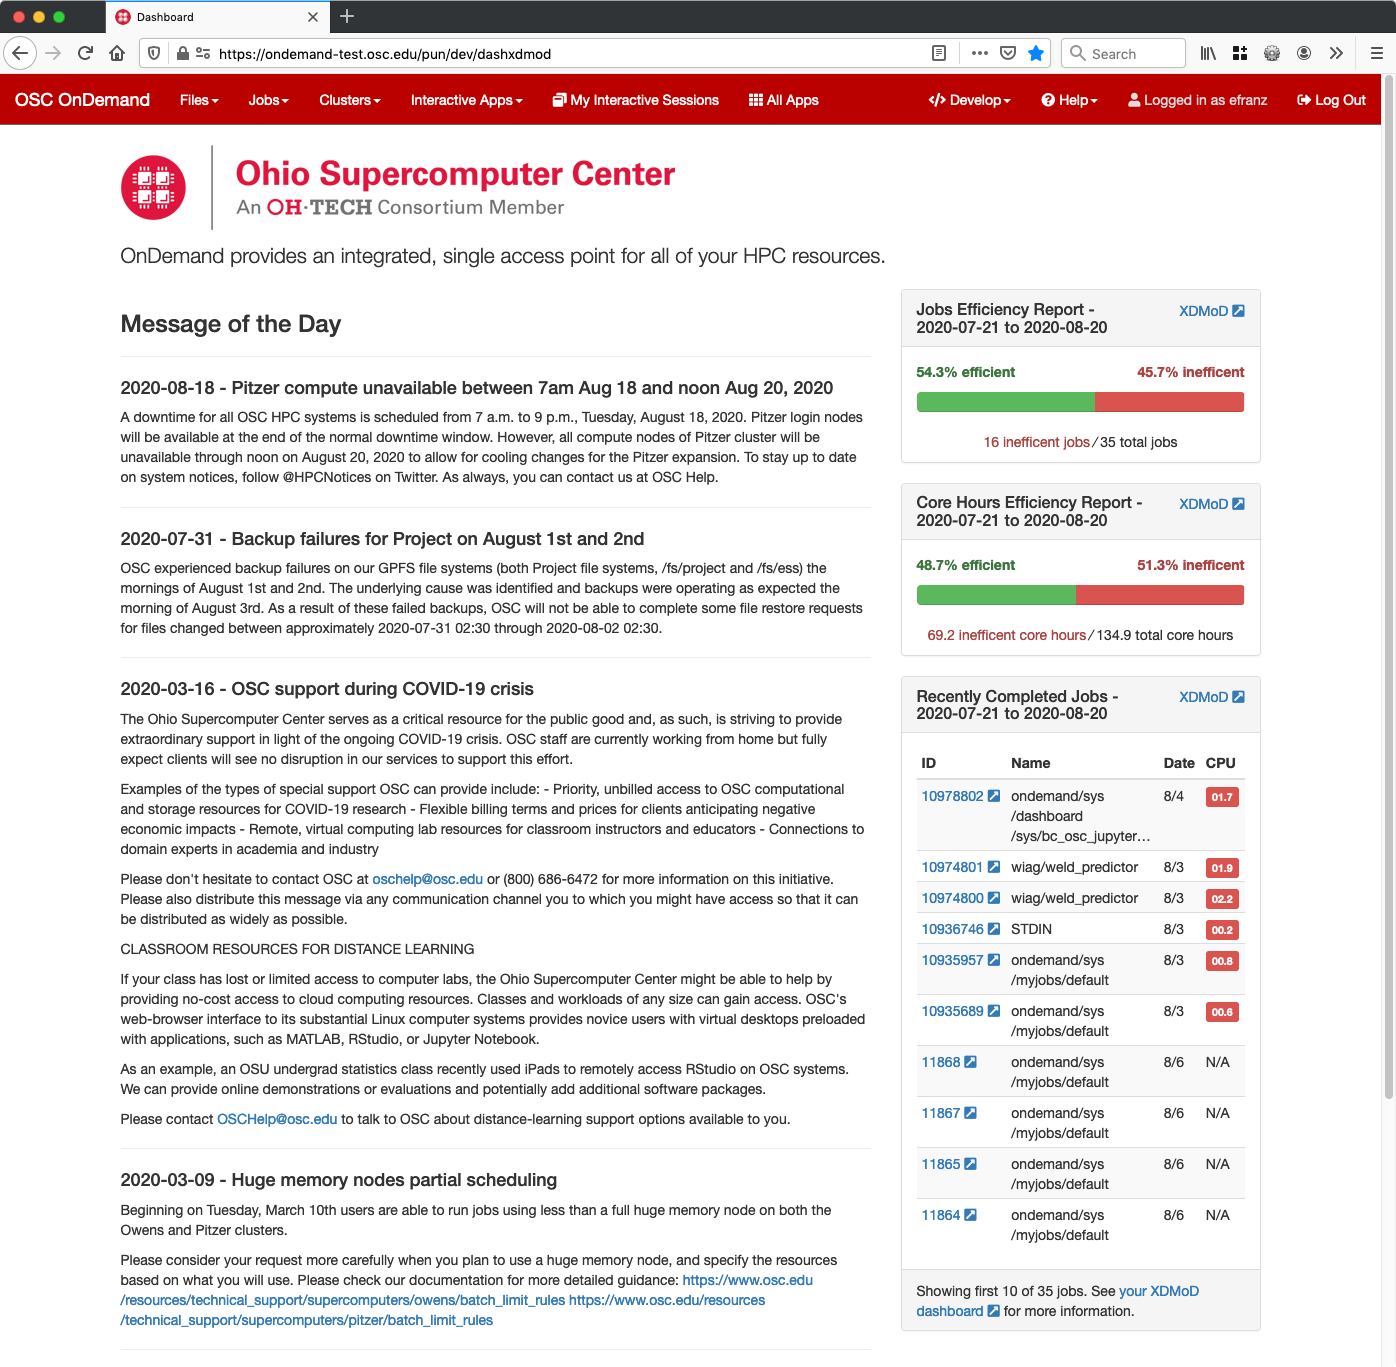
Fig. 5 Example of XDMoD Job Efficiency reports in the OnDemand Dashboard.
Steps to enable the XDMoD reports in the OnDemand Dashboard:
Configure OnDemand with XDMoD host URL in PUN
/etc/ood/config/nginx_stage.yml.pun_custom_env: OOD_XDMOD_HOST: "https://xdmod.osc.edu"
Add OnDemand host as domain to XDMoD portal settings for CORS
/etc/xdmod/portal_settings.ini.domains = "https://ondemand.osc.edu"
Configure identity provider to include OnDemand host in HTTP Content-Security-Policy for frame-ancestors since OnDemand uses an iframe to trigger SSO with XDMoD when a user logs in. Below is what we ensured Content-Security-Policy header for frame-ancestors was set to when configuring Keycloak:
frame-ancestors https://*.osc.edu 'self'
If you want the XDMoD links in the OnDemand Job Composer you also need to configure OnDemand with XDMoD resource id in each cluster configuration. For example, in the
hpctoolsetthe resource_id for the HPC cluster is 1 in XDMoD, so we modify/etc/ood/config/clusters.d/hpc.ymlto add a XDMoD map to the custom map at the bottom of the file:v2: metadata: title: "HPC Cluster" login: host: "frontend" job: adapter: "slurm" cluster: "hpc" bin: "/usr/bin" custom: xdmod: resource_id: 1
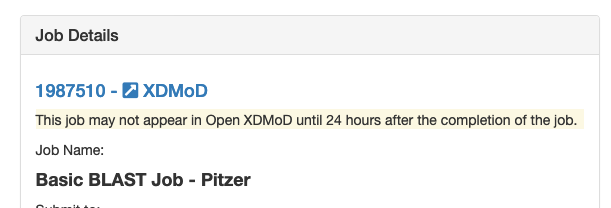
In the Job Composer, Open XDMoD job links will include a warning message that the job may not appear in XDMoD for up to 24 hours after the job completed. The message is to address the gap of time between the job appearing as completed in the Job Composer and the job appearing in Open XDMoD after the ingest and aggregation script is run. This message appears from the time the Job Composer becomes aware of the job completion status, till an elapsed time specified in seconds by the locale key
en.jobcomposer.xdmod_url_warning_message_seconds_after_job_completionwhich defaults to 24 hours (86400 seconds) with a text message specified by locale keyen.jobcomposer.xdmod_url_warning_message. To disable this message, set the value you your locale file under/etc/ood/config/locales. For example, in the default locale we have these values:en: jobcomposer: xdmod_url_warning_message: "This job may not appear in Open XDMoD until 24 hours after the completion of the job." xdmod_url_warning_message_seconds_after_job_completion: 86400
Which results in these warning messages appearing in Job Composer:

Accessing Remote File Systems
Since 2.1 you can use rclone to interact with remote file systems. Since
every command in Open OnDemand is issued as the user, the user themselves
are required to setup their rclone remotes.
You can refer to the OSC's rclone documentation on how to configure rclone remotes.
To enable this feature ensure that rclone is installed on the same machine
that Open OnDemand is installed. You also have to enable the feature through
the configuration entry for enabling remote filesystems.
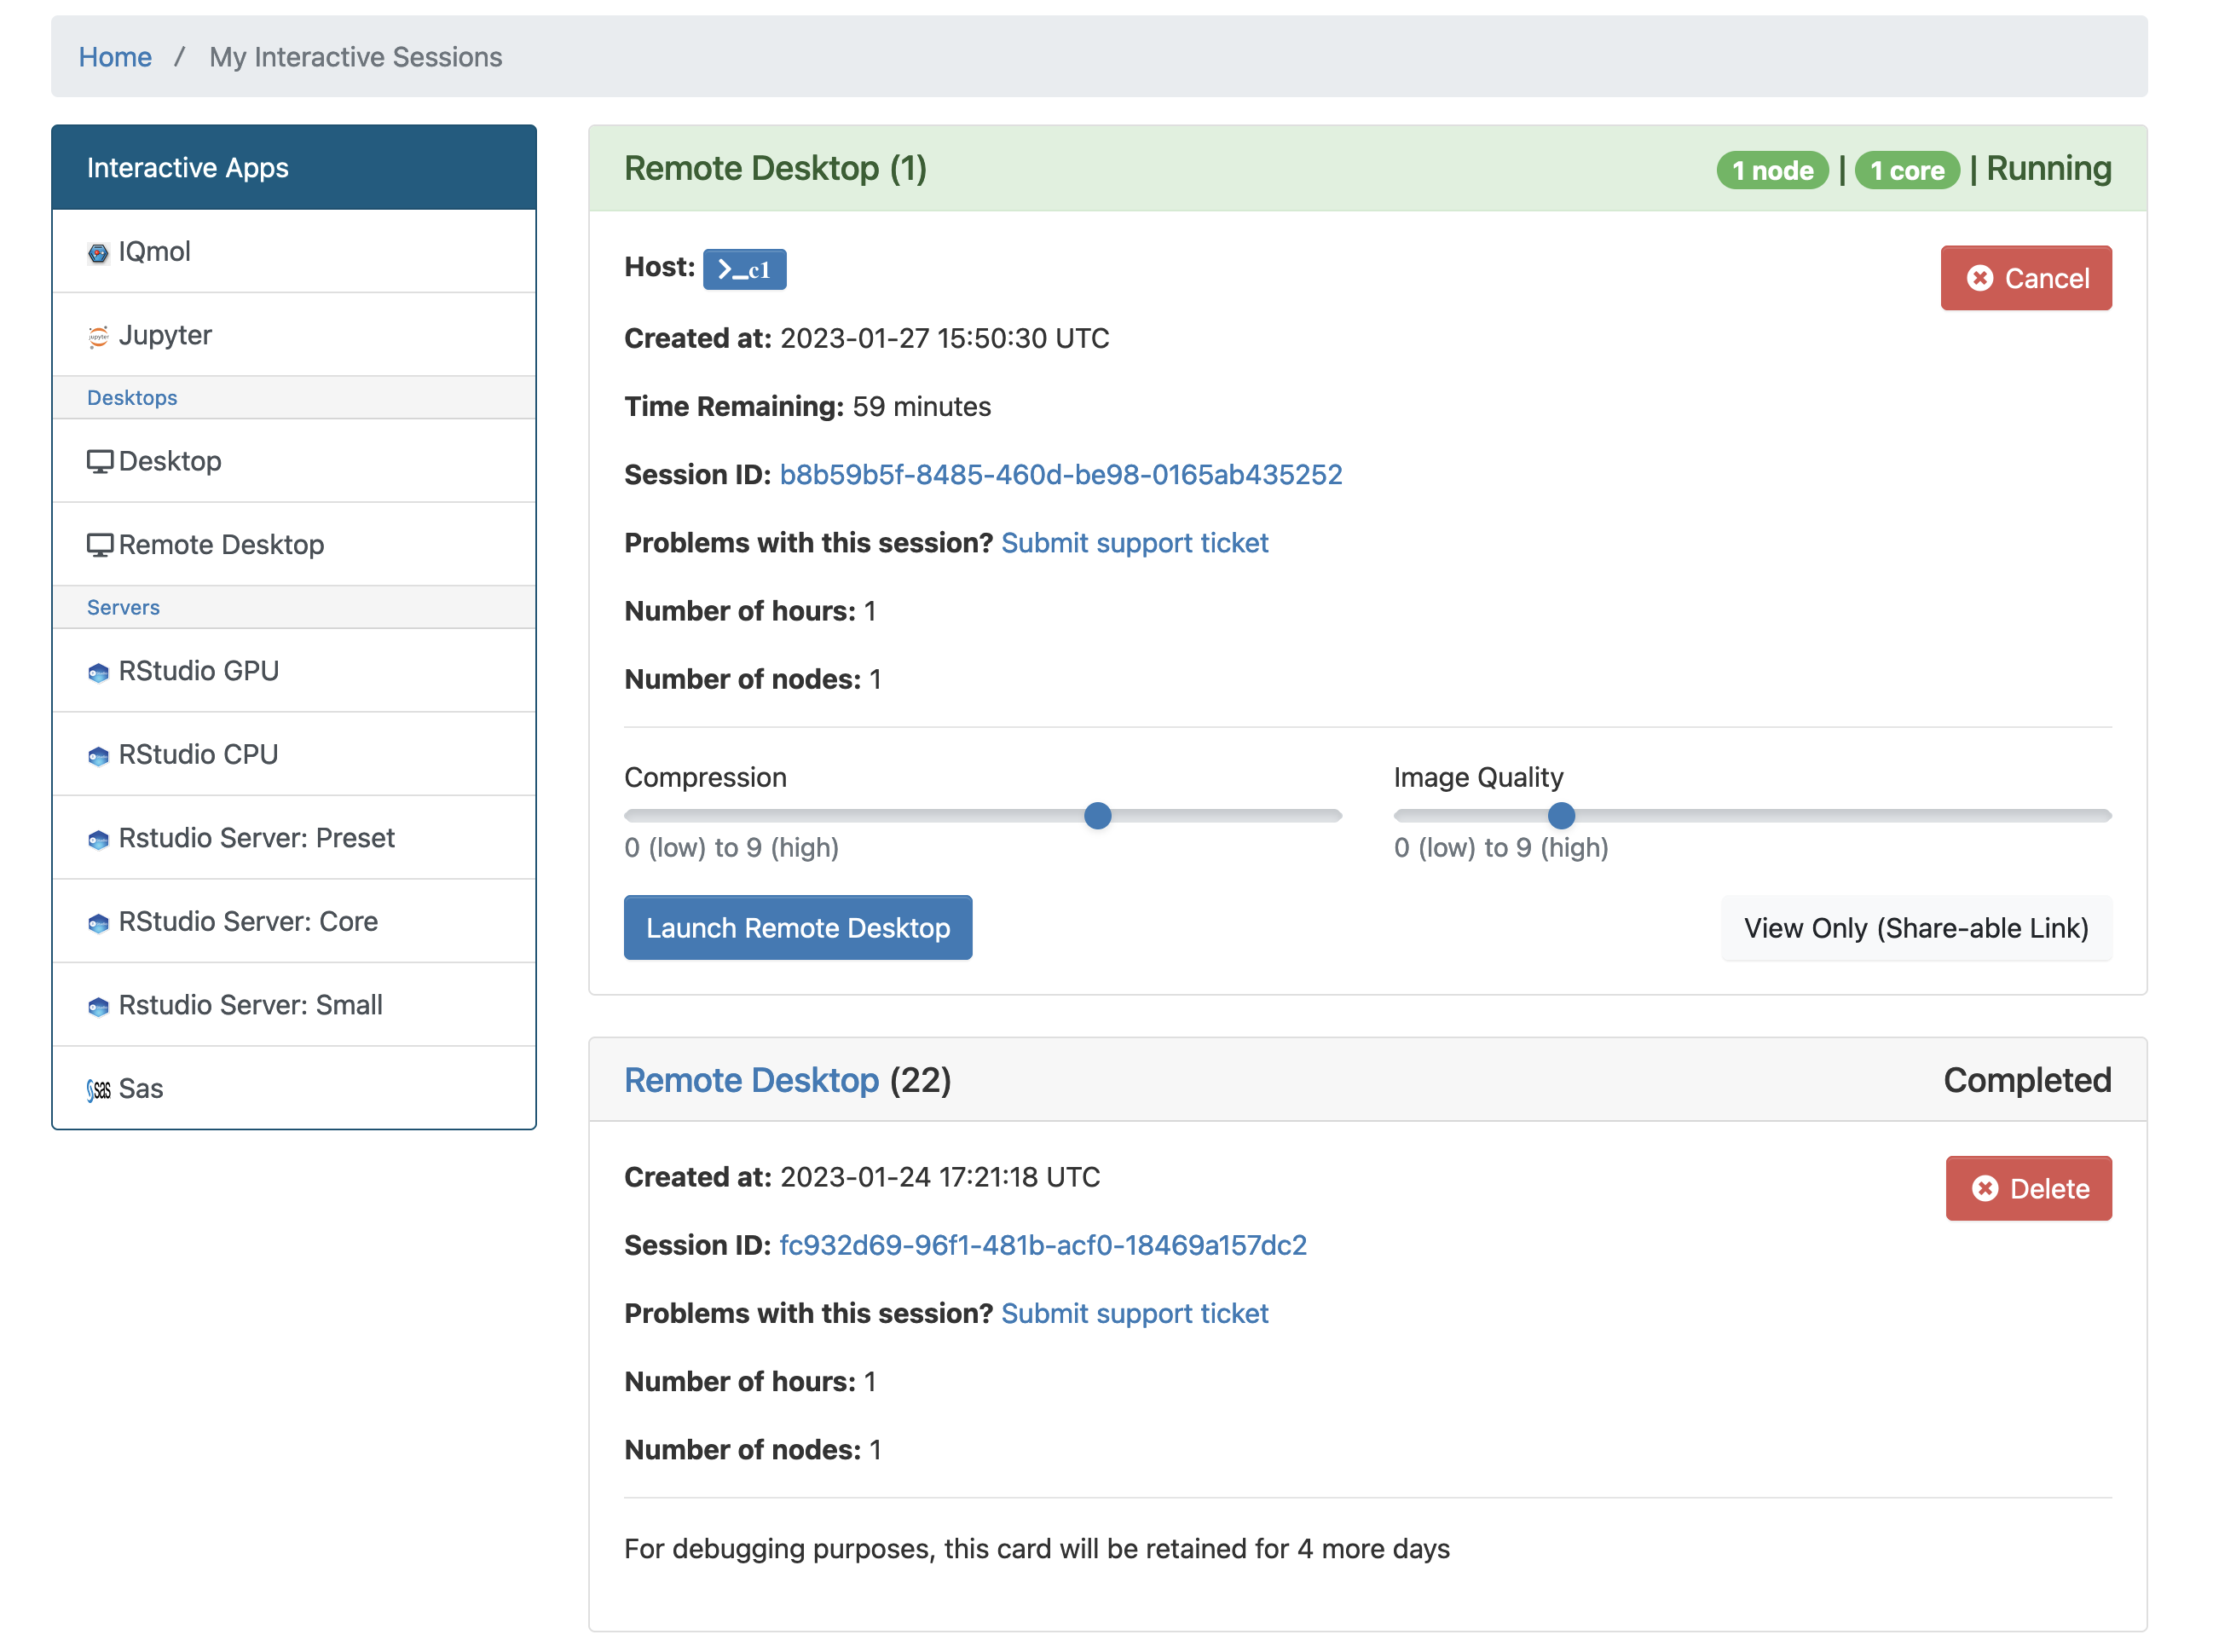
Cancel Interactive Sessions
We can now cancel an interactive session from the session panel without deleting the session card. This functionality will allow users to remove the job from the scheduler and keep the information in the OnDemand interface.
This feature is disabled behind a feature toggle. To enable it, set the configuration property cancel_session_enabled: true.
For more information on how to configure properties, see configuration documentation.
When enabled, the cancel button will appear for active sessions.
When the session is canceled, the job will be canceled in the scheduler,
the status will change to completed, and the session card will be kept.
For completed sessions, the system will only show the delete button.
Custom Pages
Custom pages allow administrators to add custom content to new dashboard pages. These new pages are configured using layouts and widgets, in the same way as customizing the layout for the dashboard.
To create a custom page, add a layout under a new page_code to the custom_pages property object.
For more information on how to setup dashboard properties, see OnDemand configuration files
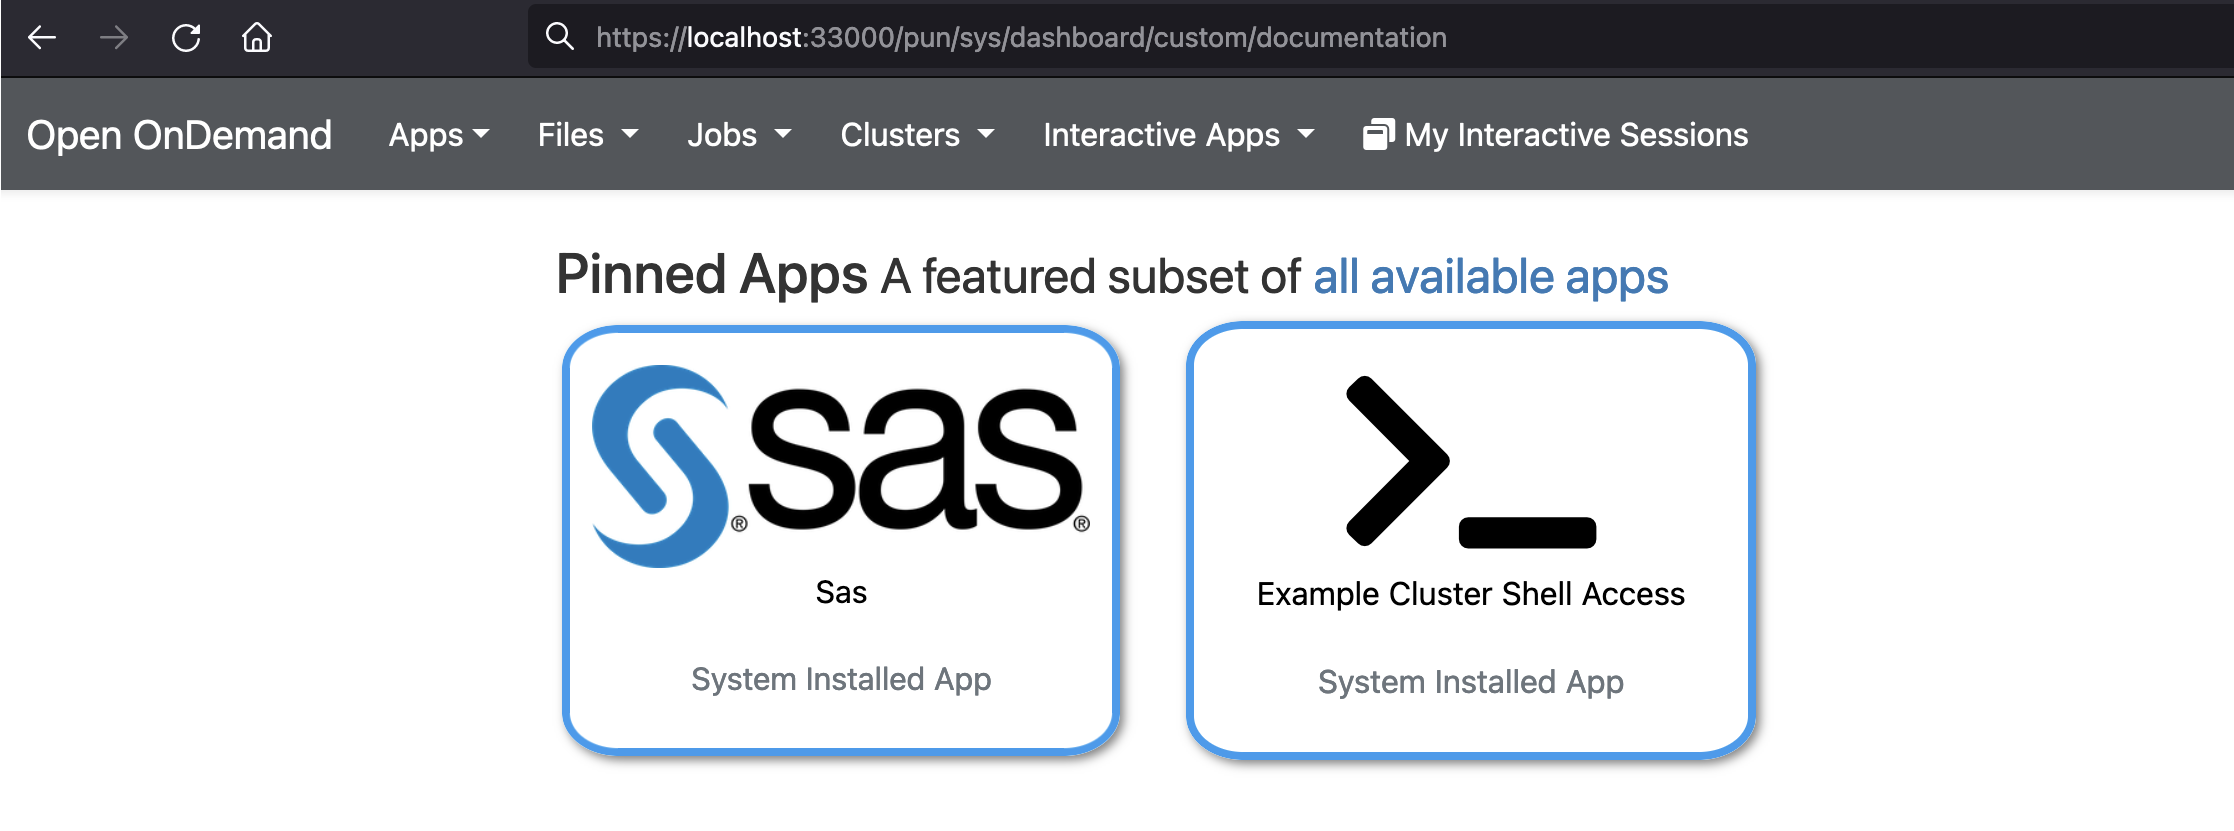
Custom pages have their own URL based on their page_code: /pun/sys/dashboard/custom/page_code.
The example configuration below creates a custom page with the page_code: documentation.
It will render a layout with the pinned_apps widget under the URL: /pun/sys/dashboard/custom/documentation.
custom_pages:
  documentation:
    rows:
      - columns:
          - width: 12
            widgets:
              - "pinned_apps"
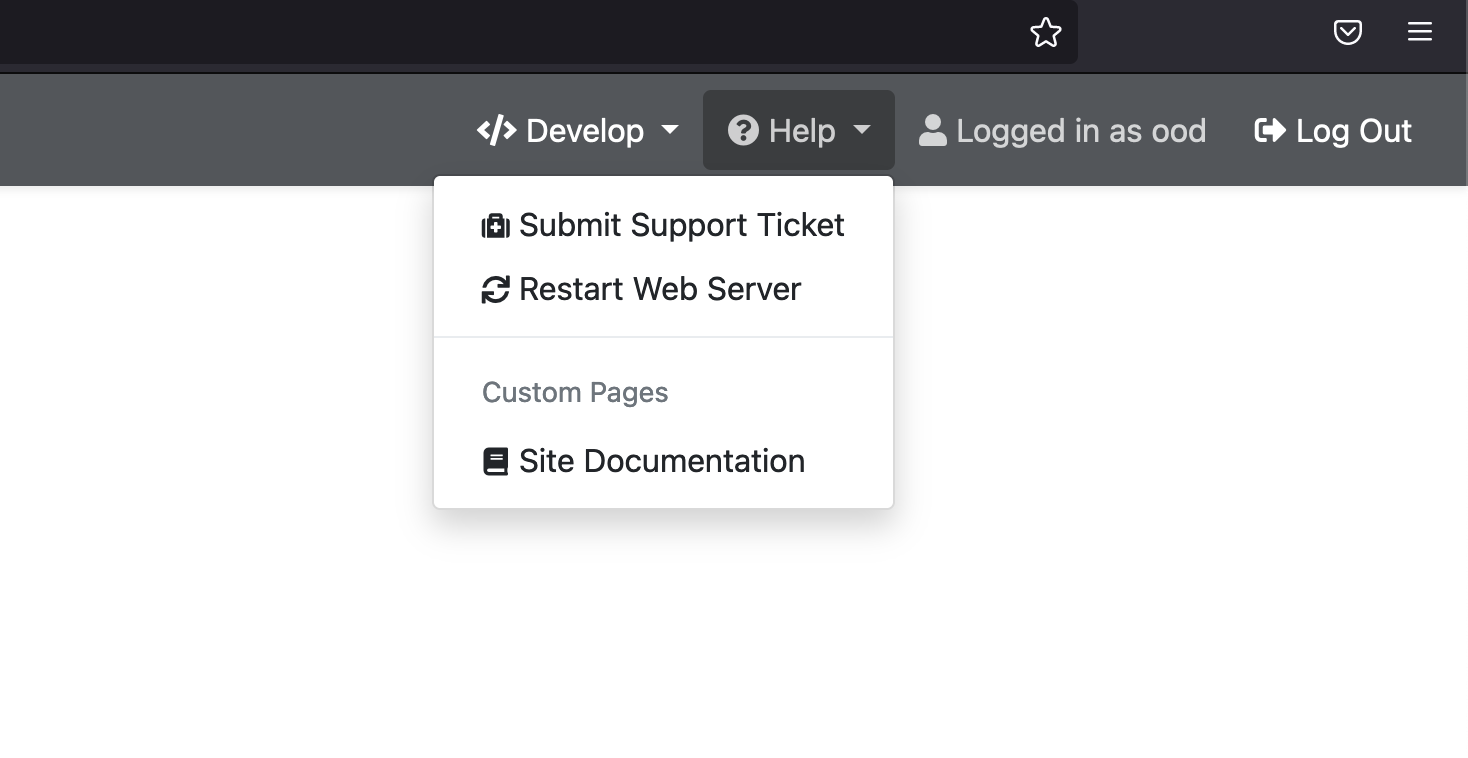
Links to the custom pages can be added the Help drop-down menu.
To add links to the Help menu use the configuration property help_menu.
See the documentation on adding urls to the Help menu for details and examples.
Adding custom pages links uses the same notation and attributes as when created for the custom Dashboard navbar. See How to add menus for custom pages.
# Adding a link to the custom page with page_code = "documentation"
help_menu:
  - group: "Custom Pages"
  - page: "documentation"
    title: "Site Documentation"
    icon: "fas://book"
Support Tickets
The Dashboard now supports sending a support ticket to your institution Help Desk system. The feature uses email as the delivery mechanism, but it could be extended to support others.
To enable this feature, define the settings needed using the configuration property support_ticket.
Once this configuration object is defined, the Submit Support Ticket link will be shown in the Help navigation menu
and in all interactive session cards.
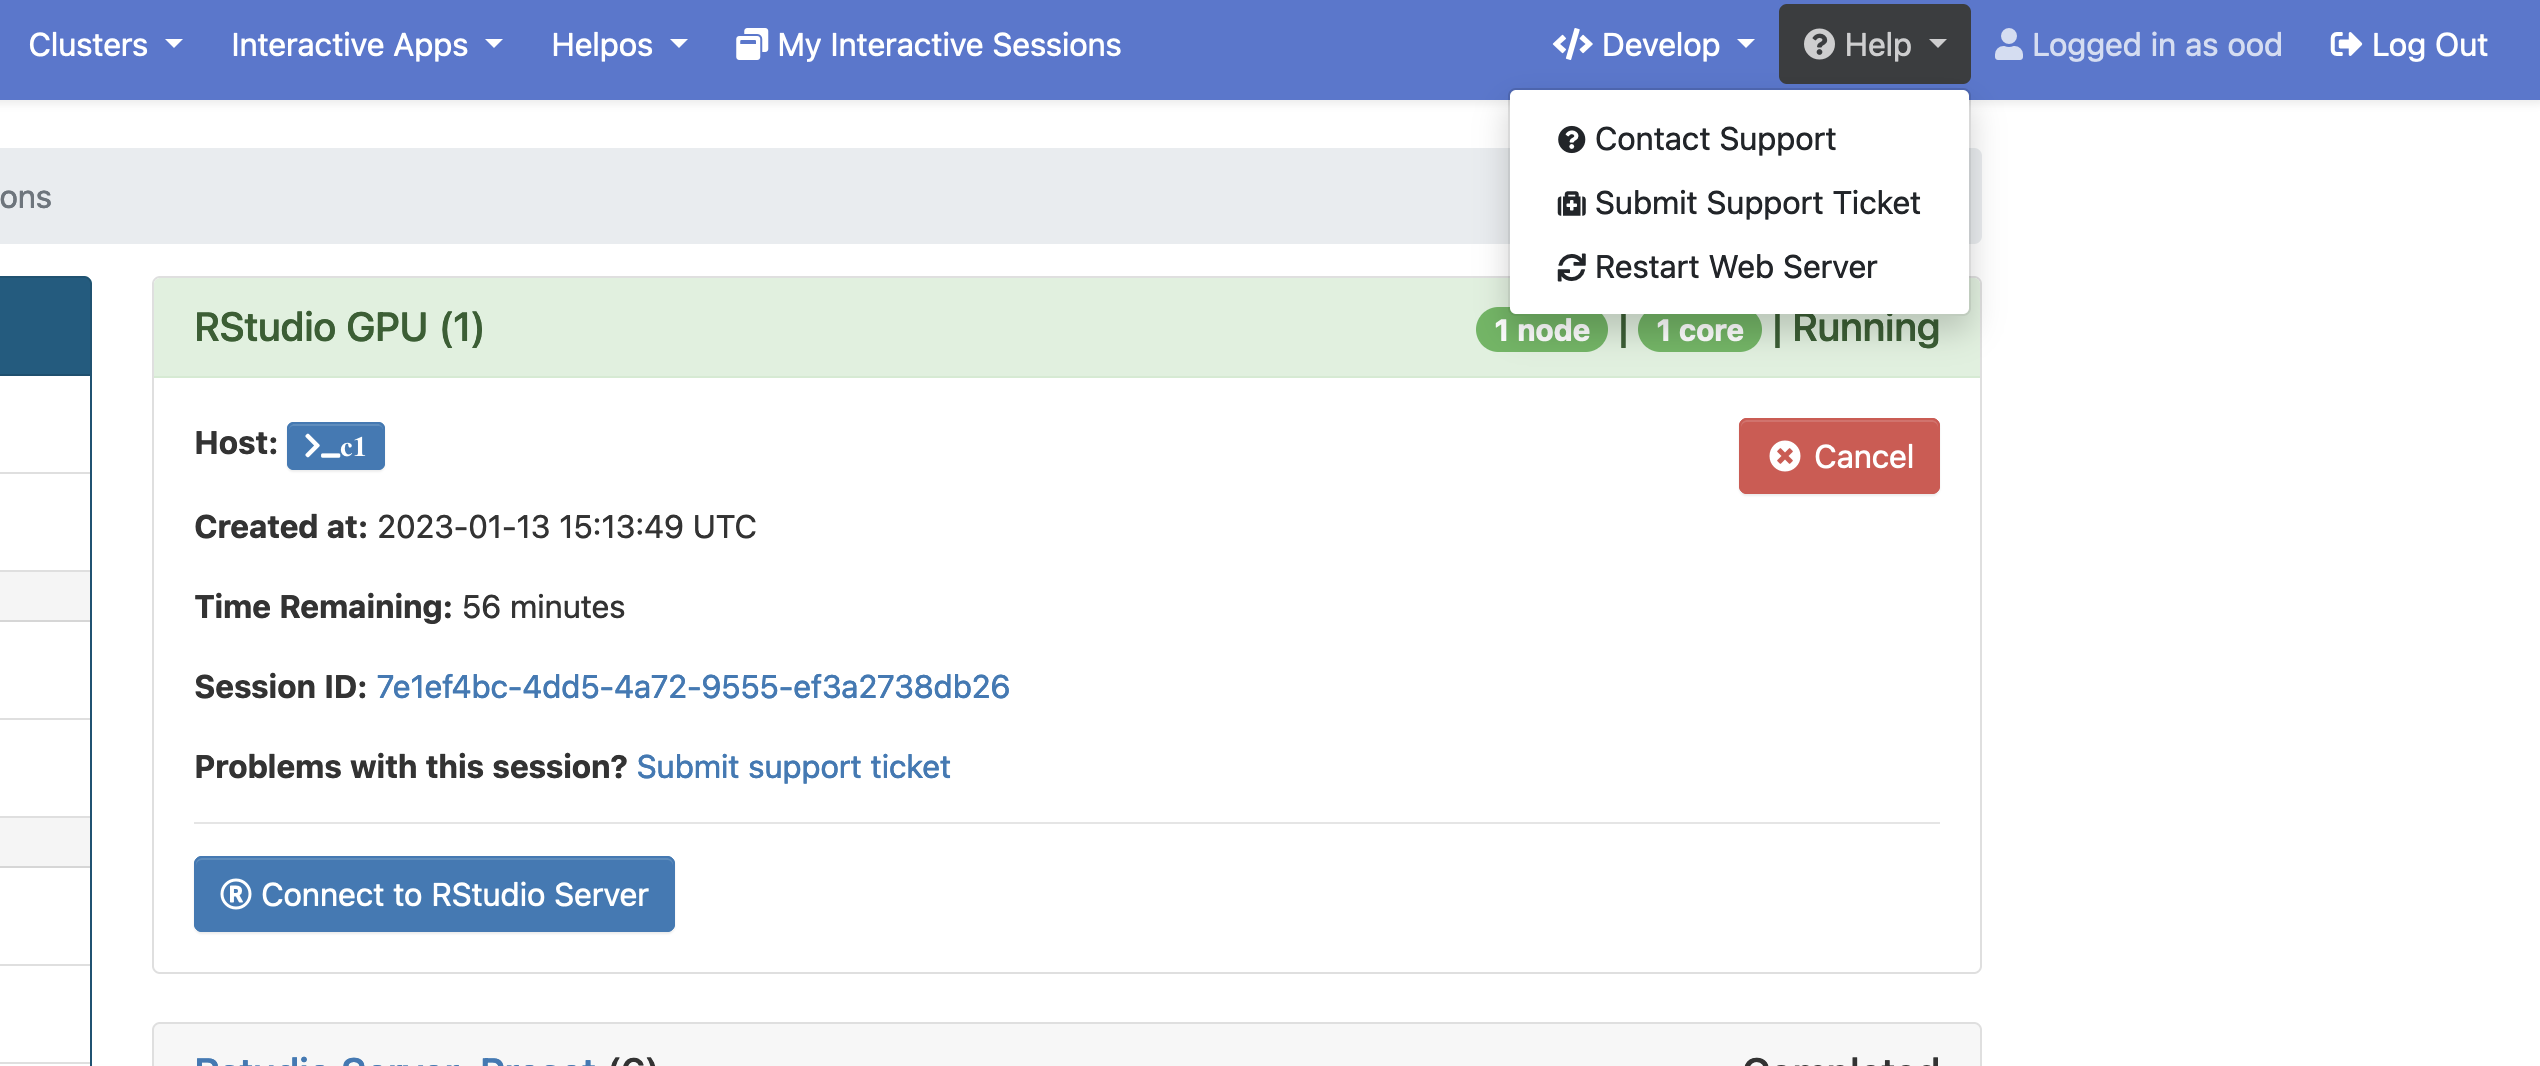
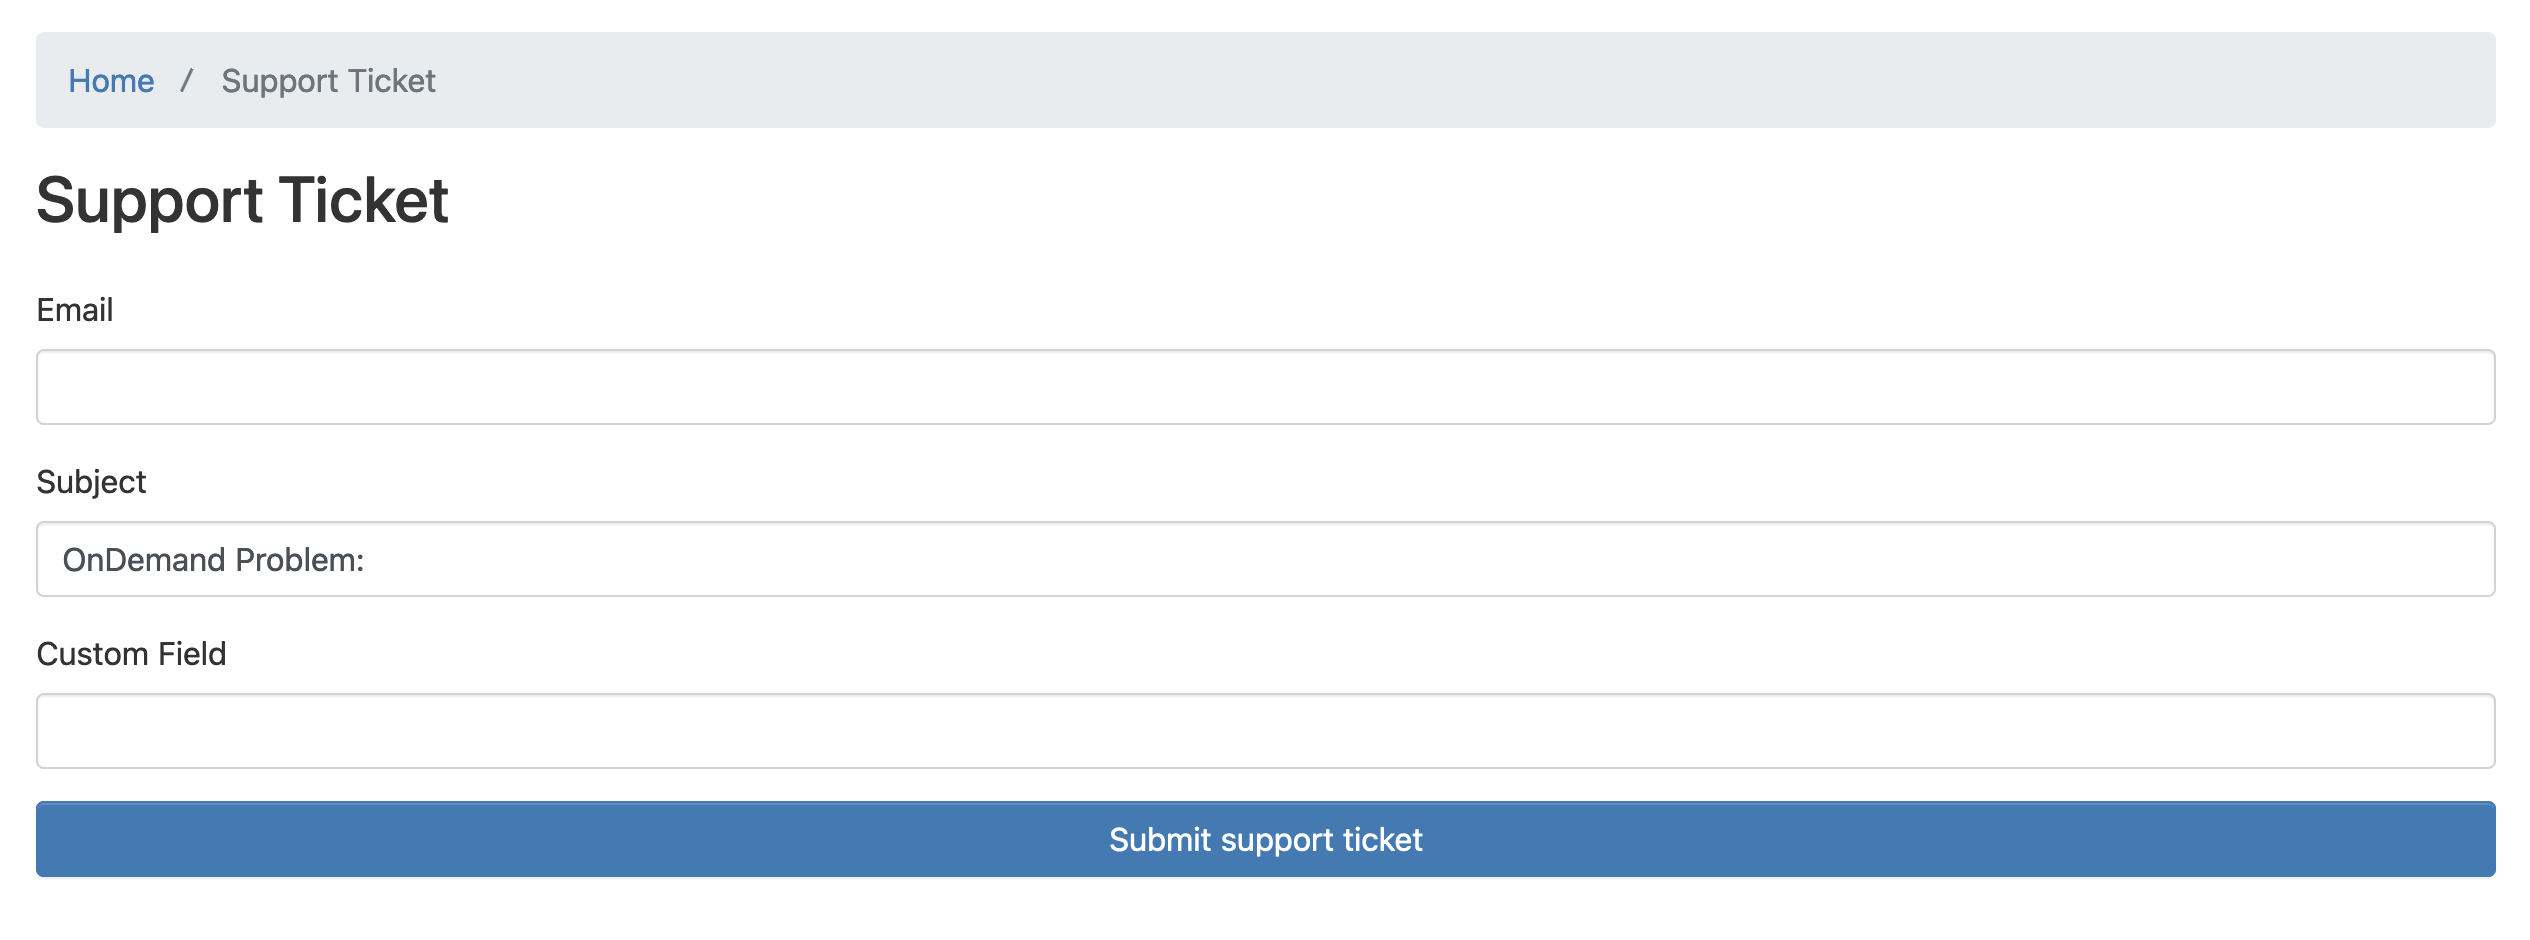
The support ticket page has a simple form to gather information that will be submitted to the support system via email. If triggered from a session card, the system will automatically add information about the selected session to the body of the email to help troubleshoot the issue.
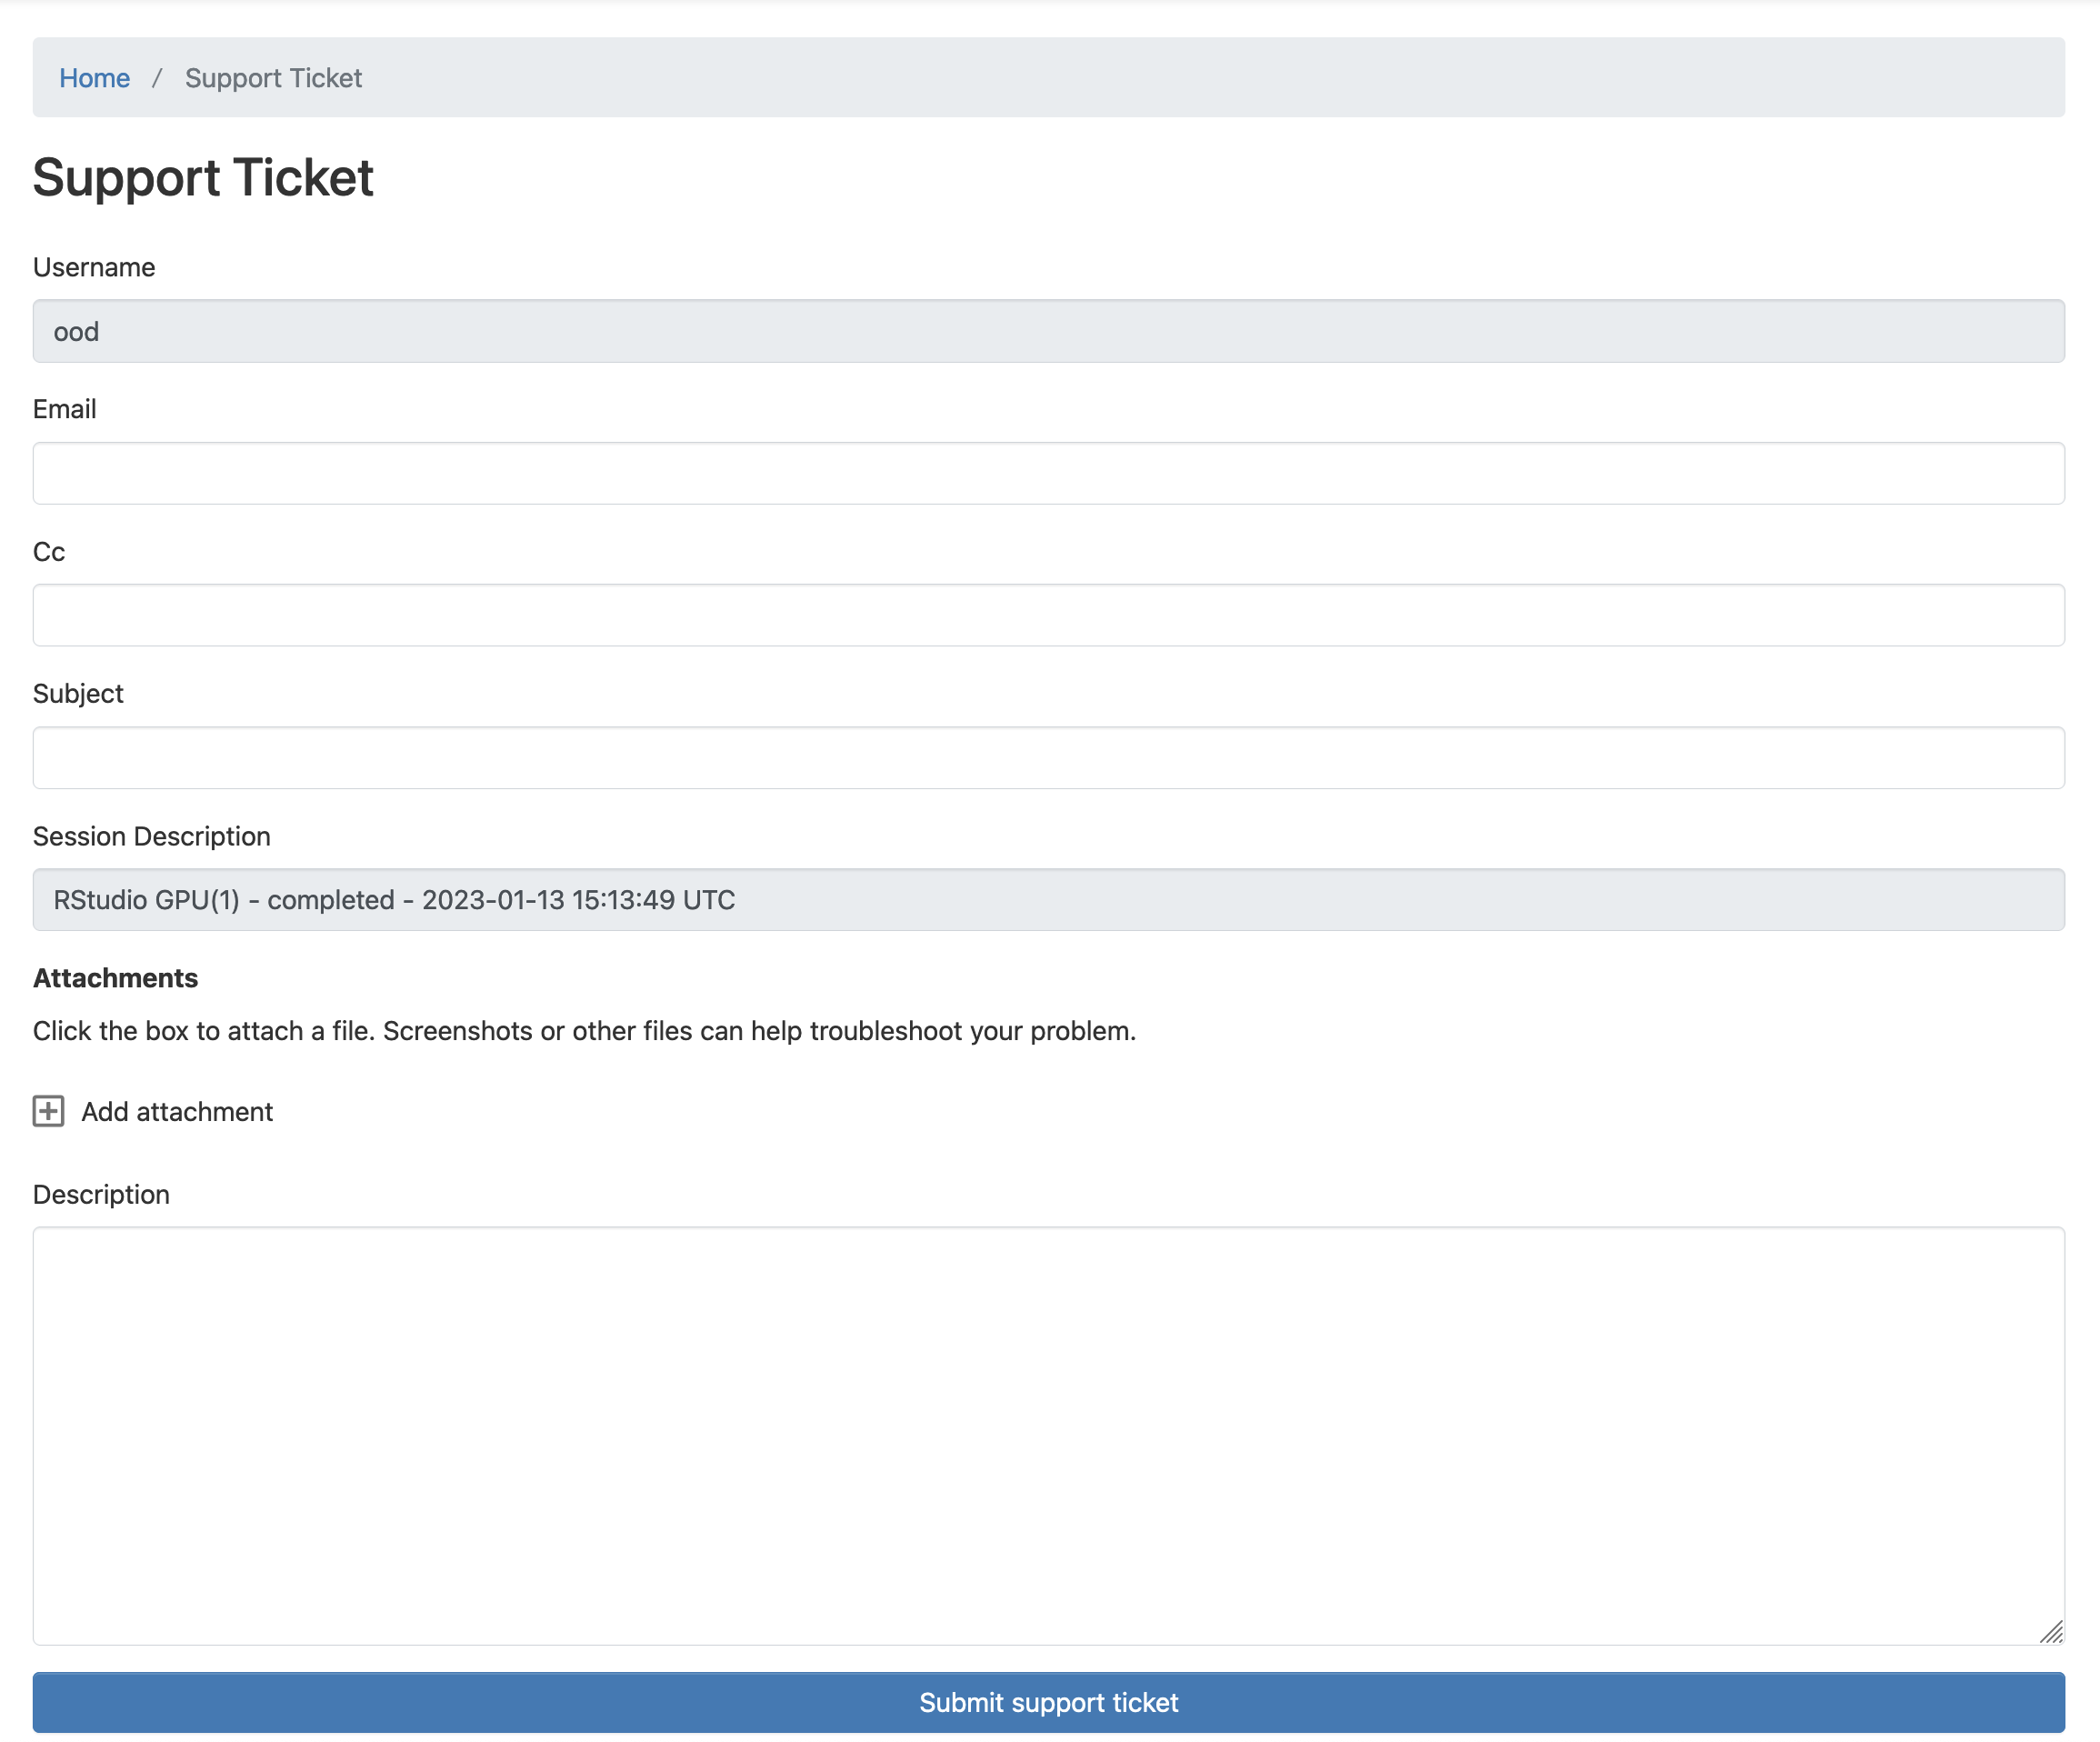
A brief description of the default form fields used in the support ticket form:
Username: Logged in user. Username will be added to the support ticket body for reference.
Email: Email address to communicate regarding this support ticket. A single email address is supported.
CC: Additional email address to communicate regarding this ticket. A single email address is supported.
Subject: Brief description of the problem.
Attachments: Add screenshots of the problem to help with debugging and troubleshooting.
Description: Detail description of the problem.
Configuration
These are the most common configuration properties needed to enable and setup the support ticket feature:
description: Text to customize the support ticket header.email: Section to configure how the email is sent to the support system.to: The destination email address of your Help Desk.from: The address to set in the from field when sending the email. It defaults to the email submitted in the support ticket form. This is useful to prevent the incoming emails being considered spam.delivery_method: Rails setting to set the transport mechanism to use. This is usuallysmtp. For more information see the Rails documentation on mailers.delivery_settings: Rails settings object to set the transport configuration properties. See example below or the Rails documentation on mailers.
Warning
Use caution when supplying username and password in delivery_settings. These files are readable by unprivileged users and as such this information can be found by a sophisticated user without privilege escalation.
Sample configuration:
support_ticket:
  # Optional.
  # Validation configuration for attachments.
  attachments:
    # Maximum number of attachments. Defaults to 4
    max_items: 1
    # Maximum size for a single attachment in bytes. Defaults to 6MB
    # Common file sizes:
    #  2MB = 2097152
    #  5MB = 5242880
    #  6MB = 6291456
    #  10MB = 10485760
    max_size: 2097152
  # Optional.
  # Text added to the page under the support ticket header
  description: |
    My optional description Text for the support ticket feature

  # email section is required and should always be present.
  # It configures how the support ticket email is sent
  email:
    # Required.
    # Your support system email address. The email will be sent to this address
    to: "support@support.system.com"
    # Optional.
    # To set the email from field. Defaults to the email set in the form.
    # The email set in the form will always be added to the reply-to email field
    from: "config@example.com"

    # delivery_method and delivery_settings are Rails configuration items
    # that can be set in this file to simplify configuration.
    # If you prefer, you can configure Rails in the usual way.
    delivery_method: "smtp"
    delivery_settings:
      address: 'smtp.gmail.com'
      port: 587
      domain: 'example.com'
      user_name: '<username>'
      password: '<password>'
      authentication: 'plain'
      enable_starttls_auto: true
      open_timeout: 15
      read_timeout: 15
Customizations
The support ticket form can be customized using the form and attributes configuration properties.
In the same way that you can configure the form for interactive applications,
the support ticket form fields can be arranged or changed as required.
Note
Please note that the email field must be present in the form for the support ticket feature to be functional.
Custom fields can be added, but they will require a custom email template to make use of the provided values in the email body.
Override the default email template with your own by dropping a file named _email.text.erb into the folder
/etc/ood/config/apps/dashboard/views/support_ticket/email/
This is the default form for submitting support tickets. You can use this YAML as a starting place for removing and/or adding fields.
support_ticket:
  email: must supplied by you

  attributes:
    username:
      value: "<%= CurrentUser.name %>"
      readonly: true
    email:
      widget: email_field
      required: true
    cc:
      widget: email_field
    subject:
      required: true
    session_id:
      widget: hidden_field
    session_description:
      hide_when_empty: true
      disabled: true
    attachments:
      widget: file_attachments
    description:
      widget: text_area
      required: true
      rows: 10
    queue:
      widget: hidden_field

  form:
    - username
    - email
    - cc
    - subject
    - session_id
    - session_description
    - attachments
    - description
    - queue
The example below shows a custom form configuration with 3 fields and how to use them in the template to generate the email body.
support_ticket:
  # email section is required and should always be present.
  # It configures how the support ticket email is sent
  email:
    to: "support@support.system.com"

  attributes:
    email:
      required: true
    subject:
      value: "OnDemand Problem: "
  form:
    - email
    - subject
    - department
# /etc/ood/config/apps/dashboard/views/support_ticket/email/_email.text.erb Email Intro Department: <%= @context.support_ticket.department %> Subject Copy: <%= @context.support_ticket.subject %> Other static data.